
Introduction
This article covers our migration from OpenEBS to Longhorn on Kubernetes. We show how we moved persistent volumes over safely, and how we set up automated backups in Longhorn afterward.
Running two storage backends on the same Kubernetes cluster adds operational overhead you don’t need. Different failure modes, different backup mechanisms, more surface area to monitor and patch. In our case, some workloads sat on OpenEBS’s LVM local PV provisioner while everything else already ran on Longhorn.
Background: Why We Moved to Longhorn
Our cluster originally used OpenEBS’s LVM local PV provisioner for some workloads, alongside Longhorn for others. Running two storage backends side by side added operational overhead: different failure modes, different backup mechanisms, and more surface area to monitor and patch. We decided to standardize on Longhorn as the single storage layer for the cluster.
What is Longhorn?
Longhorn is a cloud-native distributed block storage system for Kubernetes. Unlike OpenEBS’s LVM local PV, which ties a volume’s data to a single node’s local disk, Longhorn replicates each volume across multiple nodes. This gives us a few concrete advantages:
- Data replication across nodes, so a single node failure doesn’t mean data loss.
- Volumes can be scheduled onto (and moved between) any node in the cluster, rather than being pinned to wherever the data physically lives.
- A built-in UI for managing volumes, snapshots, and backups – no extra tooling required.
- Native support for scheduled, incremental backups to S3-compatible object storage.
- Easier disaster recovery: volumes can be restored from backup onto a fresh cluster if needed.
In short, Longhorn gave us both better resilience and a simpler day-2 operating model, which made it worth the one-time cost of migrating the OpenEBS-backed volumes.
More info about Longhorn Persistent Storage for Kubernetes
Planning the OpenEBS to Longhorn Migration
Before touching anything, we identified which PVCs were still running on the OpenEBS storage class, so we knew exactly what needed to move.
$ kubectl get sc
$ kubectl get pvc -o wide -A
Example output: (the pvc using the openebs-lvmpv sc is the one we going to migrate)
NAMESPACE    NAME                    STATUS   VOLUME                                     CAPACITY   ACCESS MODES   STORAGECLASS    AGE     VOLUMEMODE
default      smoke-longhorn          Bound    pvc-790ba330-49da-4104-9f46-2b23fe4a7a15   1Gi        RWO            longhorn        12d     Filesystem
default      smoke-lvm               Bound    pvc-56a43352-2fb1-4834-978e-dd09f3fbaaa1   1Gi        RWO            openebs-lvmpv   12d     Filesystem
monitoring   data-thanos-receive-0   Bound    pvc-5e51655b-f7cc-4f4b-8707-9ea7c93dfb9b   10Gi       RWO            longhorn        11d     Filesystem
wazuh        data-wazuh-indexer-0    Bound    pvc-e861d929-f449-4c08-9866-5d3247d1d1bd   10Gi       RWO            longhorn        4d20h   Filesystem
We then inspected the pod using that PVC to confirm its mount path and any other volume-related configuration before planning the cutover:
$ kubectl get pod lvm-test -o yaml
$ kubectl describe pod lvm-test
Migration: Step by Step
Our approach was straightforward and safe for small-to-medium volumes: provision a new Longhorn PVC, copy the data across via a temporary pod that mounts both volumes, verify the copy, then cut the workload over to the new volume.
Step 1 – Create the New Longhorn PVC
We defined a new PVC using the longhorn storage class:
# pvc.yaml
apiVersion: v1
kind: PersistentVolumeClaim
metadata:
  name: smoke-longhorn-migrated
  namespace: default
spec:
  accessModes:
    - ReadWriteOnce
  storageClassName: longhorn
  resources:
    requests:
      storage: 1Gi
$ kubectl apply -f pvc.yaml
Step 2 – Stop the Workload
To avoid writing to the old volume while data is being copied, we stopped any pod using it. For a bare pod, that’s a simple delete:
$ kubectl delete pod lvm-testIf the workload is managed by a Deployment or StatefulSet, scale it down instead.
$ kubectl scale deployment <deployment-name> --replicas=0
$ kubectl scale statefulset <statefulset-name> --replicas=0
Step 3 – Create a Temporary Migration Pod
We used a lightweight Alpine pod that mounts both the old (OpenEBS) and new (Longhorn) PVCs at the same time, purely to copy data between them:
# migrate.yaml
apiVersion: v1
kind: Pod
metadata:
  name: migrate-lvm
  namespace: default
spec:
  restartPolicy: Never
  containers:
  - name: migrate
    image: alpine
    command: ["sh", "-c", "sleep 3600"]
    volumeMounts:
    - name: old
      mountPath: /old
    - name: new
      mountPath: /new
  volumes:
  - name: old
    persistentVolumeClaim:
      claimName: smoke-lvm
  - name: new
    persistentVolumeClaim:
      claimName: smoke-longhorn-migrated
$ kubectl apply -f migrate.yaml
Then we double-check that both PVCs mounted correctly before copying anything:
$ kubectl describe pod migrate-lvm

# Confirm:
#   old -> smoke-lvm
#   new -> smoke-longhorn-migrated
Step 4 – Copy the Data
With both volumes mounted, we copied the data across using tar, which preserves permissions with the -p flag:
$ kubectl exec -it migrate-lvm -- sh
# cd /old
# rsync -aHAX --info=progress2 /old/ /new/
## IF YOU DONT HAVE RSYNC INSTALL WITH THIS COMMAND:
# apk add --no-cache rsync
Step 5 – Verify the Copy
Before deleting anything, we confirmed the data matched on both sides:
# du -sh /old
# du -sh /new
# ls /old
# ls /new
# Make sure size and file listing on /old and /new match.
Step 6 – Point the Workload at the New Volume
We created (or updated) the workload to use the new Longhorn-backed PVC:
# lvm-test.yaml
apiVersion: v1
kind: Pod
metadata:
  name: lvm-test
spec:
  containers:
  - name: app
    image: nginx
    volumeMounts:
    - name: data
      mountPath: /data
  volumes:
  - name: data
    persistentVolumeClaim:
      claimName: smoke-longhorn-migrated
$ kubectl apply -f lvm-test.yaml
Step 7 – Validate
We confirmed the pod came up healthy and was actually bound to the new Longhorn PVC:
$ kubectl get pod lvm-test
# Expect: Running

$ kubectl describe pod lvm-test | grep ClaimName
And confirmed the application data was intact from inside the pod:
$ kubectl exec -it lvm-test -- sh
# ls /data
# Confirm the same files are present
Step 8 – Clean Up
Once validated, we removed the temporary migration pod and the old OpenEBS PVC:
$ kubectl delete pod migrate-lvm
$ kubectl delete pvc smoke-lvm
Finally, a cluster-wide check confirmed no OpenEBS-backed PVCs remained:
$ kubectl get pvc -A
# Confirm only 'longhorn' storage class is in use - no 'openebs' entries left
NOTICE: Once OpenEBS Deleted there’s no return and the data from OpenEBS is GONE!
Setting Up Backups in Longhorn
With everything running on Longhorn, the next step was to configure automated backups to S3-compatible object storage, so volumes could be restored in case of node loss or data corruption.
Create the S3 Credentials Secret
Longhorn reads S3 credentials from a Kubernetes secret in the longhorn-system namespace:
$ kubectl -n longhorn-system create secret generic s3-secret \
  --from-literal=AWS_ACCESS_KEY_ID=<your-access-key> \
  --from-literal=AWS_SECRET_ACCESS_KEY=<your-secret-key> \
  --from-literal=AWS_ENDPOINTS=<your-s3-endpoint>
Define the Backup Target
We then set the backup target and pointed it at the secret created above:
$ kubectl apply -f - <<EOF
apiVersion: longhorn.io/v1beta2
kind: Setting
metadata:
  name: backup-target
  namespace: longhorn-system
value: s3://<your-bucket>@<your-region>/
EOF

$ kubectl apply -f - <<EOF
apiVersion: longhorn.io/v1beta2
kind: Setting
metadata:
  name: backup-target-credential-secret
  namespace: longhorn-system
value: s3-secret
EOF
Configure the Backup Target in the Longhorn UI
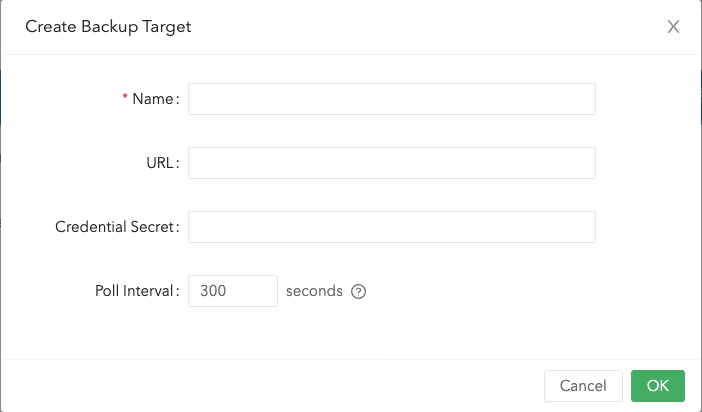
From the Longhorn dashboard, go to Backups → Backup Target:

Click Create Backup Target and fill in:
- Name – a name for the backup target
- URL – the S3 (or MinIO) address
- Credential Secret – the name of the secret created earlier (s3-secret)
- Poll Interval – we left this at the default, 300 seconds
Attach and Back Up a Volume
In the Volumes tab, select the volume to back up. Make sure it’s attached – if not, attach it to one of the worker nodes first:
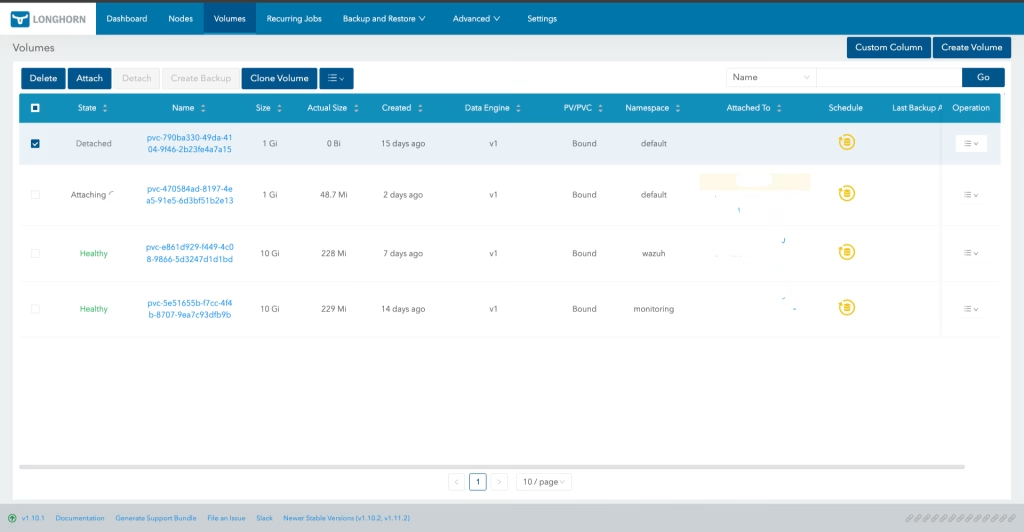
Once attached, open the volume and click Create Backup. The backup will move from Progress to Completed:
The completed backup will then be visible under Backup → Backups:
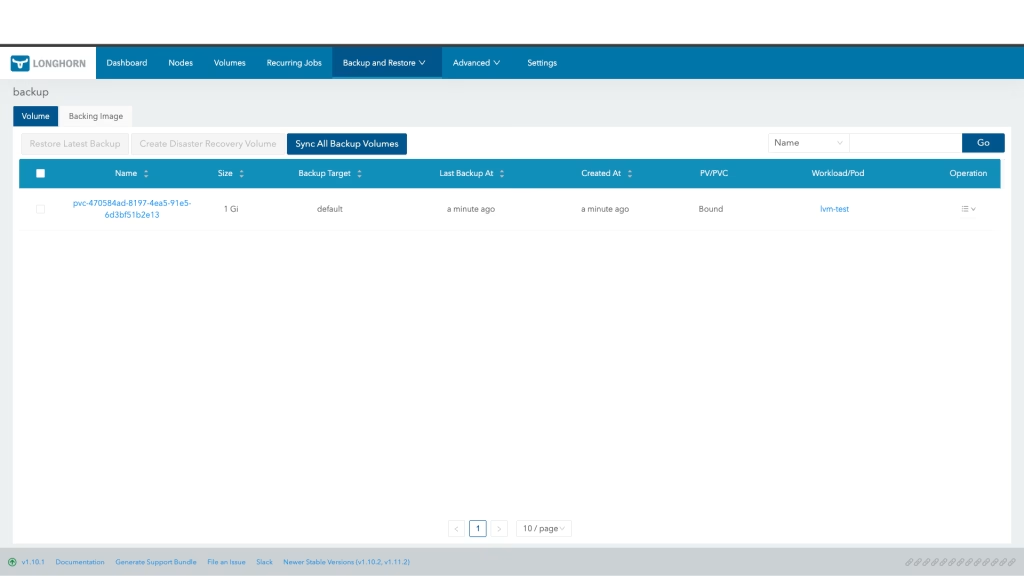
Restore from a Backup
To restore a volume from a backup, go to the Backup and Restore section and click Backup:
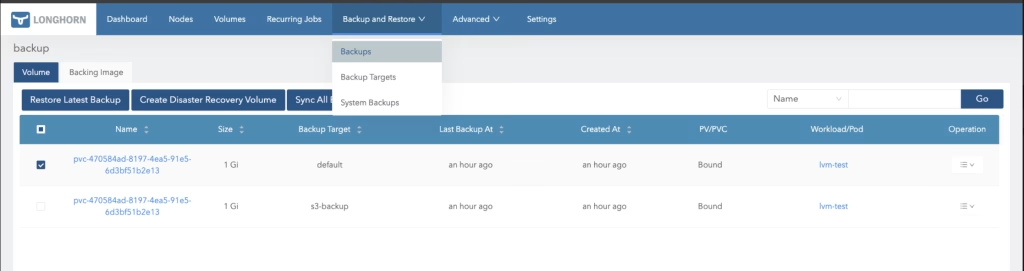
Choose the backup you want to restore and click Restore Latest Backup:
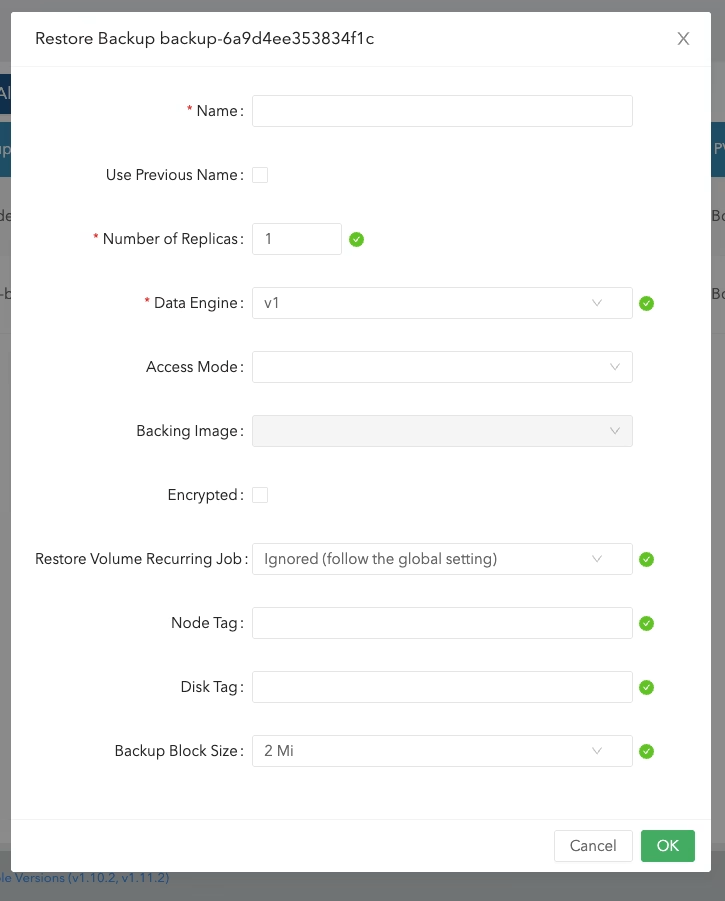
Fill in the restore details as needed – the restored volume will become available within minutes under the Volumes section.

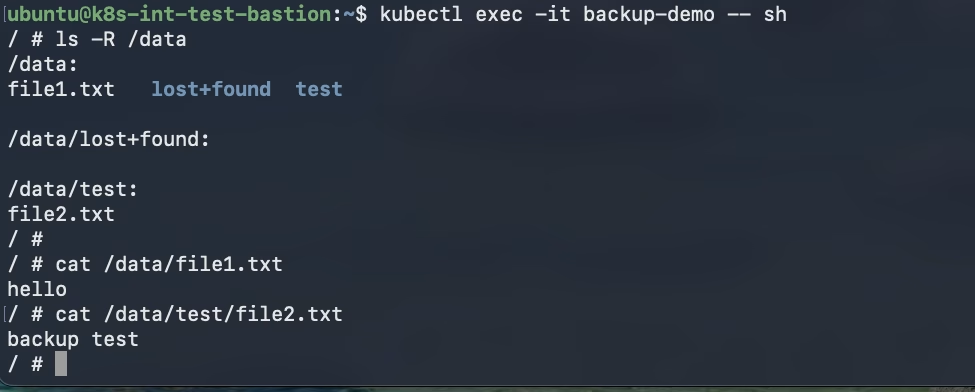
Wait until the backup will be ready and then exec the pod and check if the right files are exist.
Summary
In conclusion, our migration from OpenEBS to Longhorn removed a second storage backend from our cluster. We now run on one storage layer instead of two. This gives us node-level resilience through replication. It also gave us native, UI-driven S3 backups, with almost no extra tooling required.
The migration was low-risk by design. The temporary dual-mount pod kept the old volume untouched. We only removed it after verifying the copy. This gave us a fallback until the very last cleanup step. At Octopus we value ours and our customers’ infrastructure and this represent
This pattern can be reused for future migrations and customers. Provision a new PVC. Copy data with a dual-mount pod. Verify the copy. Cut over. Clean up. It works for any storage-class migration, not just OpenEBS to Longhorn.
For more info about longhorn you can visit the docs here.