In this post, we’ll dive into how to deploy a Kubernetes cluster completely offline using Kubespray — an open-source, Ansible-based automation toolkit for provisioning, configuring, and managing Kubernetes clusters.
Kubespray’s flexibility and modular design make it ideal for air-gapped environments, where internet connectivity is limited or unavailable. Whether you’re setting up a secure enterprise cluster or building a lab for experimentation, Kubespray lets you bring the full Kubernetes experience to isolated networks.
Our Lab Setup Includes:
- 🌐 Full Air-Gapped Environment
- 🔒 Self-Signed Certificates
- 🧭 Private DNS Service
- 🐳 Harbor Registry for Offline Images
- ⚙️ Kubespray-Offline Repository & Tooling
- ☸️ Fully Functional Kubernetes Cluster (HA)
- 🌍 Local Web Server for Hosting Air-Gapped Resources
This guide walks you through building a production-ready, highly available, and self-contained Kubernetes environment — including key components like MetalLB for load balancing and NGINX Ingress for internal routing — all tailored for offline deployment.
We’ll also leverage helper scripts from the Run:AI Professional Services GitHub repository to simplify setup and automate repetitive steps.
Diagram
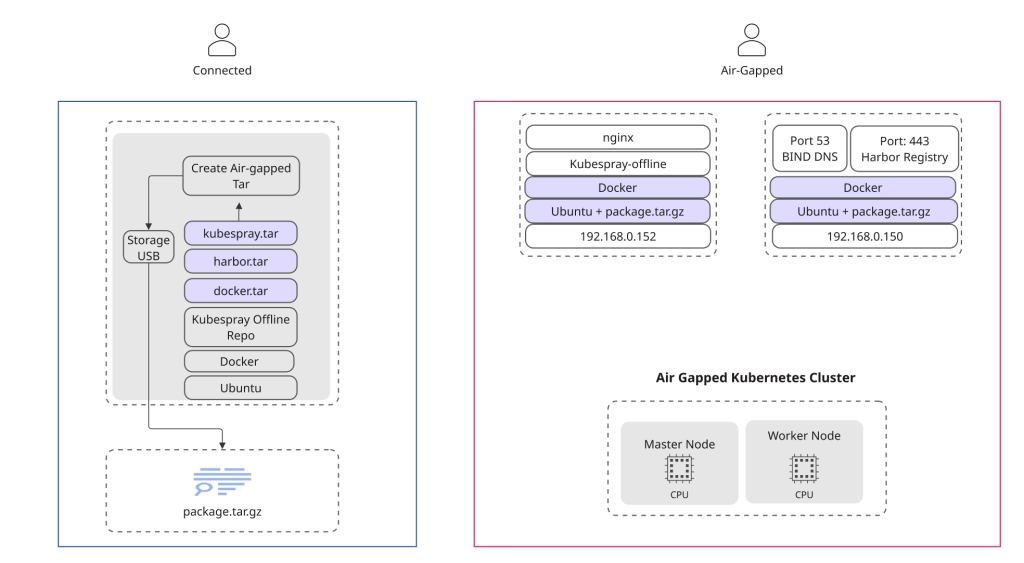
Prepare Full Air-Gapped packages
Next, we’ll gather all the resources needed for our offline setup and organize them into a portable package.
- Create Self Signed Certificates
- Prepare Docker images → Create
docker.tarwith all required images. - Download Harbor → Get the offline Harbor tarball.
- Download Kubespray-Offline → Build the full offline bundle.
- Package everything → Compress all files into one
.tarfor easy transfer.
Create Directory structure
mkdir harbor bind kubespray docker certificatesCreate Self Signed Certificates – ( Kubespray-online Server)
Before we can bring our air-gapped Kubernetes environment to life, we’ll need to generate a set of self-signed certificates that will secure all internal services and registries across the cluster.
We’ll create certificates for the following domains:
*.runai.local*.cluster.runai.local
This process will generate:
runai.crtandrunai.key— the primary certificate and key pair for all*.runai.localsubdomains.full-chain.pem— a complete self-signed certificate chain for client-side validation and secure access within the offline network.
These certificates will serve as the foundation for encrypted communication and trust across the entire air-gapped environment.
wget https://raw.githubusercontent.com/runai-professional-services/runai-installer/refs/heads/modules/create-cert.sh

chmod +x ./create-cert.sh
./create-cert.sh --dns "runai.local","*.cluster.runai.local" --test

✅ Done. Generated files:
  CA Key           : ./certificates/rootCA.key
  CA Certificate   : ./certificates/rootCA.pem
  Service Key      : ./certificates/runai.key
  CSR              : ./certificates/runai.csr
  Service Cert     : ./certificates/runai.crt
  Full Chain (PEM) : ./certificates/full-chain.pem
copy all certificates/* to certificates dir
Prepare Docker files for Air-Gapped Environment
Navigate to the Docker directory:
cd dockerVerify no external Docker registry is referenced:
grep -r "download.docker.com" /etc/apt/sources.list /etc/apt/sources.list.d/Download all required packages:
apt-get download python3-jsonschema python3-pyrsistent python3-dotenv \
python3-attr python3-setuptools docker.io docker-compose containerd runc \
bridge-utils pigz iptables ubuntu-fan apparmor libapparmor1 libseccomp2 \
libyajl2 libltdl7 python3-docker python3-dockerpty python3-docopt \
python3-yaml python3-requests python3-urllib3 python3-websocket \
python3-texttable python3-cached-property python3-certifi \
python3-charset-normalizer python3-idna python3-distutils
Bundle everything into a tar archive:
tar cfv docker.tar docker-files
cp docker.tar docker/
Download and package the Bind DNS server image for offline use:
cd bind
docker pull  ubuntu/bind9:latest
docker save ubuntu/bind9:latest  -o  bind.tar
This will create bind.tar, a portable image you can later load into your air-gapped environment to provide internal DNS services.
Prepare Harbor files for Air-Gapped Environment
cd harbor
wget https://github.com/goharbor/harbor/releases/download/v2.14.0/harbor-offline-installer-v2.14.0.tgz
Prepare Kubespray Offline for Air-Gapped Environment
Clone the Kubespray-Offline repository and build the offline bundle:
git clone https://github.com/kubespray-offline/kubespray-offline.git
cd kubespray-offline
git checkout v2.28.1-0
Edit config.sh to use Docker (comment out other runtime options), then run:
./download-all.sh   # Downloads all required files for offline deployment
tar cfv kubespray-offline.tar outputs
cp  kubespray-offline.tar kubespray/
At this stage we have all the files
ls -la
drwxrwxr-x  2 kirson kirson 4096 Oct 10 20:20 bind
drwxrwxr-x  2 kirson kirson 4096 Oct 10 20:20 docker
drwxrwxr-x  2 kirson kirson 4096 Oct 10 20:20 harbor
drwxrwxr-x  2 kirson kirson 4096 Oct 10 20:20 kubespray

tar cfv package.tar *
At this stage we need to copy the package.tar to all servers within the air-gapped environment.
Distributing the Certificates
Perform the following steps:
Install and refresh the system CA store (on each node):
sudo cp /usr/local/share/ca-certificates/rootCA.crt /usr/local/share/ca-certificates/ ; sudo update-ca-certificates --freshCopy the domain certificates to the Harbor registry host
scp runai.crt runai.key @harbor.runai.local:/home/kirson/tower/certificateDNS Server Installation
Server name:
harbor.runai.local / 192.168.0.150
we will use a Docker image to ease our process –
Open the package.tar and go to docker directory, open the docker.tar files and run the command below.
sudo dpkg -i containerd_*.deb runc_*.deb docker.io_*.deb python3-*.deb docker-compose_*.deb
sudo systemctl start docker && sudo systemctl enable docker
cd bind ; sudo docker load -i bind.tar
mkdir -p cache config etc/bind records run var/cached/bind var/lib/bind
tree
├── cache
├── config
│ ├── db.runai.local
│ └── named.conf
├── docker-compose.yaml
├── etc
│ └── bind
├── README
├── records
├── restart.sh
├── run
└── var
├── cached
│ └── bind
└── lib
└── bindDNS Server configuration
Example of db.runai.local – to house our internal DNS Address – make sure its under /config directory
;
; BIND data file for runai.local
;
$TTL    2d
$ORIGIN runai.local.
@       IN      SOA     ns.runai.local. admin.runai.local. (
                              4         ; Serial
                             12h        ; Refresh
                             15m        ; Retry
                              3w        ; Expire
                             2h )       ; Negative Cache TTL
;
@       IN      NS      ns.runai.local.
ns    		        IN        A       192.168.0.150


; Infrastracutre
bcm10-headnode          IN        A       192.168.0.234

haproxy                 IN       A        192.168.0.220
*.inference             IN       A        192.168.0.220
harbor                  IN       A        192.168.0.150
file                    IN       A        192.168.0.150
nim-airgapped           IN       A        192.168.0.231
kubespray-offline       IN       A        192.168.0.152
k8s-master-0            IN        A        192.168.0.221
Start our DNS Server – Air-gapped
Here’s an example of a docker-compose.yaml file that defines a multi-container application with a web service and a database. It showcases how to configure services, networks, and volumes for seamless container orchestration.
Im my case – i created a little one liner – restart.sh
docker rm $(docker ps |grep bind |awk '{ print $1 }' ) --force ; docker-compose up -dversion: '3'
services:
bind9:
container_name: dns-server-container
image: ubuntu/bind9
ports:
- "53:53"
- "53:53/udp"
environment:
- BIND9_USER=root
- TZ=Asia/Jerusalem
volumes:
- ./config:/etc/bind
- ./cache:/var/cache/bind
- ./records:/var/lib/bind
restart: unless-stoppedpoint all your server to 192.168.0.150 / search runai.local
Harbor Installation in Offline mode
Server name:
harbor.runai.local / 192.168.0.150
In this section, we will install Harbor in offline mode to serve as a local registry for container images and other resources in our air-gapped Kubernetes environment. We will use the Harbor offline installer package, specifically version 2.13.2.
This setup ensures all necessary components are available locally, enabling a seamless deployment in an offline setting.
- FQDN will be harbor.runai.local -> 192.168.0.150
- Install docker
- Download Harbor offline version
https://github.com/goharbor/harbor/releases/download/v2.13.2/harbor-offline-installer-v2.13.2.tgz - Copy the certificate from the step above – in my case its in my /home/kirson/tower/certificate/
- Example of harbor.yaml
hostname: harbor.runai.local

https:
  port: 443
  certificate:  /home/kirson/tower/certificate/runai.crt
  private_key:  /home/kirson/tower/certificate/runai.key
Install Docker
tar xfv docker.tar && cd docker-offline
sudo dpkg -i containerd_*.deb runc_*.deb docker.io_*.deb python3-*.deb docker-compose_*.deb
sudo systemctl start docker && sudo systemctl enable docker
Once done – run the following
./install.sh

Step 5]: starting Harbor ...
Creating network "harbor_harbor" with the default driver
Creating harbor-log         ... done
Creating redis                   ... done
Creating harbor-db        ... done
Creating harbor-portal   ... done
Creating registry              ... done
Creating registryctl         ... done
Creating harbor-core     ... done
Creating harbor-jobservice ... done
Creating nginx             ... done
✔ ----Harbor has been installed and started successfully.----
you can check using the following:
docker login harbor.runai.localOpen a web-browser and point to https://harbor.runai.local create a repository called air
In this case – for lab – we will use the default User/Pass from Harbor installation and make it public
Install Kubernetes using Kubespray-Offline
Server name: Server: kubespray-offline.runai.local (192.168.0.152)
Now that our offline environment is ready, we can finally deploy Kubernetes using Kubespray-Offline.
In this stage, we’ll:
✅ Install prerequisites and configure SSH keys for Ansible
📦 Push all container images to our private Harbor registry
🗜️ Extract the package.tar bundle
⚙️ Modify key parameters for our environment
🚀 Run Kubespray and install Kubernetes
Server List
| Role | Hostname | IP Address |
| Control-Plane | k8s-master-0 | 192.168.0.221 |
| Worker Node | k8s-master-1 | 192.168.0.222 |
Extract the master package.tar
tar xfv package.tar
cd kubespray
tar  xfv kubespray-offline.tar
cd outputs
Verify Registry Settings
From the outputs directory, confirm your registry details in config.sh:
LOCAL_REGISTRY=${LOCAL_REGISTRY:-"harbor.runai.local/air"}
REGISTRY_PORT=${REGISTRY_PORT:-443}
This ensures all components pull images securely from your internal Harbor registry.
Upload Containers to harbor offline registry
First, install the container runtime:
./seup-containerd.sh
#push images
./load-push-all-images.sh
This step is essential — it uploads every container image required for the offline Kubernetes installation, ensuring the cluster can pull all images locally during deployment.
Prepare Offline Environment
./start-nginx.sh
./setup-offline.sh
./setup-py.sh
Example Inventory
.[kube_control_plane]
k8s-master-0 ansible_host=192.168.0.221 ip=192.168.0.221

[etcd:children]
kube_control_plane

[kube_node]
k8s-master-0 ansible_host=192.168.0.221 ip=192.168.0.221
k8s-worker-0 ansible_host=192.168.0.222 ip=192.168.0.222
Then run the following setup scripts to initialize the environment:
./install-containerd.sh
./setup-py.sh
./setup-offline.sh
./extract-kubespray.sh
./start-nginx.sh
Install the Required Python Environment
Create and activate a Python virtual environment for Kubespray:
# Example
 python3.11 -m venv ~/.venv/3.11
source ~/.venv/3.11/bin/activate
python --version   # check python version
Extract and Prepare Kubespray
kubespray-2.28.1
pip install -U pip
pip install -r requirements.txt
cp -rfp inventory/sample inventory/runai
cat inventory/runai/inventory.ini
Modify Add on Configuration
After running the setup scripts, the next step is to customize your cluster’s add-ons.
We’ll enable essential components like the Kubernetes Dashboard, Helm, Local Path Provisioner, MetalLB, and NGINX Ingress — all configured for offline operation.
vi runai/group_vars/k8s_cluster/addons.ymlExample Configuration
dashboard_enabled: true
helm_enabled: true

# Local Path Provisioner
local_path_provisioner_enabled: true
local_path_provisioner_namespace: "local-path-storage"
local_path_provisioner_storage_class: "local-path"
local_path_provisioner_reclaim_policy: Delete
local_path_provisioner_claim_root: /opt/local-path-provisioner/
local_path_provisioner_debug: false
local_path_provisioner_image_repo: "{{ docker_image_repo }}/rancher/local-path-provisioner"
local_path_provisioner_image_tag: "v0.0.24"
local_path_provisioner_helper_image_repo: "{{ docker_image_repo }}/air"
local_path_provisioner_helper_image_tag: "latest"

# Ingress Controller
ingress_nginx_enabled: true
ingress_nginx_host_network: false
ingress_nginx_service_type: NodePort
ingress_nginx_service_nodeport_http: 30080
ingress_nginx_service_nodeport_https: 30081
ingress_publish_status_address: ""
ingress_nginx_namespace: "ingress-nginx"

# MetalLB
metallb_enabled: true
metallb_speaker_enabled: "{{ metallb_enabled }}"
metallb_namespace: "metallb-system"
metallb_protocol: "layer2"


# Networking tweaks
kube_proxy_strict_arp: true
enable_nodelocaldns: false
Modify addons.yml within the runai directory
vi runai/group_vars/k8s_cluster/addons.yml
dashboard_enabled: true
helm_enabled: true
local_path_provisioner_enabled: true
local_path_provisioner_namespace: "local-path-storage"
local_path_provisioner_storage_class: "local-path"
local_path_provisioner_reclaim_policy: Delete
local_path_provisioner_claim_root: /opt/local-path-provisioner/
local_path_provisioner_debug: false
local_path_provisioner_image_repo: "{{ docker_image_repo }}/rancher/local-path-provisioner"
local_path_provisioner_image_tag: "v0.0.24"
local_path_provisioner_helper_image_repo: "{{ docker_image_repo }}/air"
local_path_provisioner_helper_image_tag: "latest"

ingress_nginx_enabled: true
ingress_nginx_host_network: false
ingress_nginx_service_type: NodePort
ingress_nginx_service_nodeport_http: 30080
ingress_nginx_service_nodeport_https: 30081
ingress_publish_status_address: ""
ingress_nginx_namespace: "ingress-nginx"

metallb_enabled: true
metallb_speaker_enabled: "{{ metallb_enabled }}"
metallb_namespace: "metallb-system"
metallb_protocol: "layer2"
These settings ensure your offline Kubernetes environment includes basic networking, storage, and ingress capabilities right from the start — without needing any external downloads.
Configure Calico Networking
Next, update the Calico network settings to optimize performance and simplify routing inside the offline cluster.
Edit the following file:
vi runai/group_vars/k8s_cluster/k8s-net-calico.ymlModify k8s-net-calico within the runai directory
calico_bpf_enabled: true
calico_bpf_service_mode: "DSR"
calico_vxlan_mode: "Never"
calico_ipip_mode: "Never"
This configuration enables eBPF dataplane mode with Direct Server Return (DSR), disabling both VXLAN and IP-in-IP overlays — resulting in lower latency and improved throughput for on-prem and air-gapped environments
Configure Offline Settings
Download the latest offline configuration template from the official Kubespray-Offline repository:
wget https://raw.githubusercontent.com/kubespray-offline/kubespray-offline/refs/heads/main/offline.yml -O runai/group_vars/all/offline.ymlThen edit the file and make sure the following variables are set:
I use different servers for Registry and http
### Private Container Image Registry
#
# offline.yml sample
http_server: "http://kubespray-offline.runai.local"
registry_host: "harbor.runai.local/air"
registry_addr: "harbor.runai.local/air"
files_repo: "{{ http_server }}/files"
yum_repo: "{{ http_server }}/rpms"
ubuntu_repo: "{{ http_server }}/debs"
This file is essential for offline deployments, as it redirects all image pulls and binary downloads to your internal Harbor and Kubespray-Offline web server — ensuring a completely self-contained installation
ansible-playbook -i inventory/runai/inventory.ini ../playbook/offline-repo.ymlAdd Sudo capabilites to all nodes
sudo echo "kirson ALL=(ALL) NOPASSWD: ALL" >> /etc/sudoers.d/kirsonMake sure ssh is working without a password
ssh-copy-id k8s-master-0 # Repeat on all server Make sure servers are available. Test connectivity using the ansible ping modules.
ansible -i inventory/runai/inventory.ini all -m ping -b -u kirsonInstall the cluster
ansible-playbook -i inventory/runai/inventory.ini --become --become-user=root cluster.ymlConnect to the cluster
mkdir ~kirson/.kube
cp ./inventory/runai/artifacts/admin.conf ~kirson/.kube/config
chmod +x ../files/kubernetes/v1.32.8/kubectl
sudo cp ../files/kubernetes/v1.32.8/kubectl /sbin

kubectl get nodes