Introduction
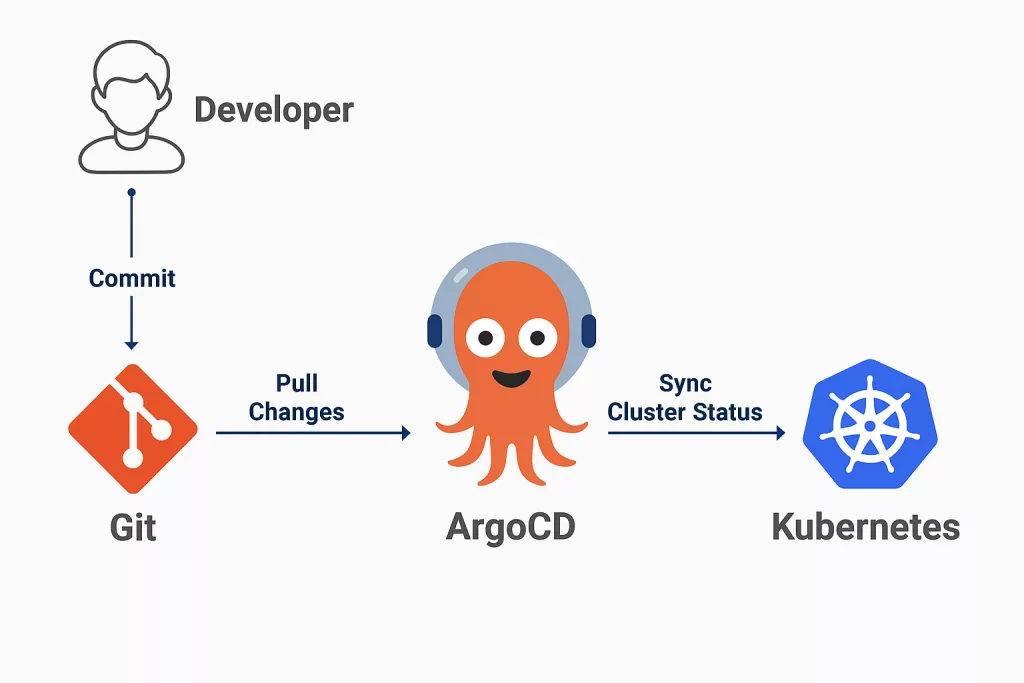
This guide introduces ArgoCD, a powerful tool for managing Kubernetes deployments. First, let’s explore its purpose. ArgoCD automates application deployment using GitOps principles. Next, it ensures consistency between your Git repository and cluster. Additionally, it simplifies complex DevOps tasks. So, let’s dive into how it works!
What is GitOps?
GitOps is a way to manage your infrastructure and application configurations using Git as the single source of truth. It’s like applying the same principles of software development (version control, pull requests, reviews, history tracking) to your infrastructure and deployments.
Instead of manually applying changes to a Kubernetes cluster using kubectl, with GitOps, you make changes in Git, and an automated system applies those changes to your cluster.
ArgoCD operates by syncing your Kubernetes cluster with a Git repository. Initially, you configure a repository with your application manifests. Then, ArgoCD monitors this repository for changes. When it detects updates, it applies them to the cluster automatically. Moreover, it provides a user-friendly interface. This interface helps you track application states. Furthermore, ArgoCD supports rollback options if issues arise. Instead of manual updates, it uses automation to save time. Finally, it integrates with tools like Helm and Kustomize.
The Main Work
Before using ArgoCD: Setting Up Helm
Before using ArgoCD, you need Helm and the argo-CLI. Let’s start with Helm.
What is Helm and How to Download It?
Helm acts as a package manager for Kubernetes. It helps you define, install, and upgrade applications easily. Moreover, it uses “charts” to bundle Kubernetes resources. To download Helm, visit helm.sh. Then, select the version for your operating system. For example, on Linux, run this command:
$ curl -fsSL -o get_helm.sh https://raw.githubusercontent.com/helm/helm/main/scripts/get-helm-3Next, make it executable:
$ chmod +x get_helm.shFinally, install it:
$ ./get_helm.shVerify it works with
$ helm versionDownloading the Helm Chart
Now, fetch the argo chart. First, add the Argo repository:
$ helm repo add argo https://argoproj.github.io/argo-helmThen, update your Helm repositories:
$ helm repo update This ensures you get the latest ArgoCD chart.
Installing ArgoCD Using Helm
With Helm ready, install ArgoCD. Run this command:
$ helm install argocd argo/argo-cd --namespace argocd --create-namespaceThis installs ArgoCD in the “argocd” namespace. If the namespace doesn’t exist, it creates one. After installation, check the pods: kubectl get pods -n argocd. You’ll see Argo components running.
Installing the ArgoCLI
The argoCLI lets you manage ArgoCD from your terminal. To install it, download the binary from ArgoCD’s GitHub releases. For Linux, use:
$ curl -sSL -o argocd https://github.com/argoproj/argo-cd/releases/latest/download/argocd-linux-amd64Next, make it executable:
$ chmod +x argocdThen, move it to your PATH:
$ sudo mv argocd /usr/local/bin/.
#Verify with:
$ argocd version
Now, you can run CLI commands like argocd app list.
Argocd syncs your Kubernetes cluster with a Git repository. First, configure a repository with your application manifests. Then, Argo monitors it for changes. When updates occur, it applies them to the cluster. Additionally, it offers a user-friendly interface. This interface tracks application states. Moreover, it supports rollbacks if problems arise. Instead of manual updates, it automates tasks. Finally, it works well with tools like Helm and Kustomize.
Logging into the ArgoCD-UI
ArgoCD provides a web interface for managing applications. To access it, expose the ArgoCD server. First, forward the port locally:
$ kubectl port-forward svc/argocd-server -n argocd 8080:443Then, open your browser to https://localhost:8080. Initially, you need the admin password. Retrieve it with:
$ kubectl -n argocd get secret argocd-initial-admin-secret -o jsonpath="{.data.password}" | base64 -dThis displays the password. Next, log in using admin as the username and that password.
NOTE: In order to be secure, change the password later via the UI or CLI.
Adding the git repository to Argo
Our goal now is to allow Argo to authenticate and sync from a private Git repository (e.g., GitHub, GitLab, Bitbucket) by storing the credentials securely. This is the git repository that Argo listen’s to, when git is changed Argo will pull the changes and will sync with the deployment in kubernetes. In production environments this is turned off.
First, make sure you’re authenticated to your argocd server:
$ argocd login <ARGOCD_SERVER> --username <USERNAME(admin)> --password <PASSWORD>Add the Private Registry Credentials, use the following CLI command:
$ argocd repo add <REPO_URL> --username <GIT-USERNAME> --password <PASSWORD(Token)>Confirm the Repo Was Added:
$ argocd repo listArgo Application
Argo Application is a YAML definition, which tells Argo what to deploy, where from, and where to.
It connects to a Git repository that holds your deployment files, such as Kubernetes manifests or Helm charts.
Then, it specifies which namespace and cluster to deploy to, ensuring everything lands in the right place.
By enabling automated sync, Argo will keep your cluster in sync with your Git repository at all times. This is not recommneded for production environments.
Moreover, it can automatically fix any drift and remove resources that are no longer defined in Git.
Thanks to the CreateNamespace option, it can even create the target namespace if it doesn’t already exist.
In short, this manifest fully automates the deployment of your app using a GitOps approach.
application.yaml Set Up:
apiVersion: argoproj.io/v1alpha1
kind: Application
metadata:
  name: my-application
  namespace: argocd

spec:
  project: default
  sources:
  - repoURL: https://gitlab.example.com/eitan/example.git
    targetRevision: HEAD
    path: k8s-yamls
  destination:
    server: https://kubernetes.default.svc
    namespace: testproject

  syncPolicy:
    automated:
      prune: true
      selfHeal: true
    syncOptions:
    - CreateNamespace=true
Save the YAML as application.yaml and apply it with:
$ kubectl apply -f application.yamlFinally, all that’s left is to open the Argo UI and check that the application is successfully deployed.
In the UI, you’ll see your application listed, and you can verify that all associated resources are running smoothly.
Open the ArgoCD UI and click the logo in the top-left corner. You’ll be redirected to the Applications page to view your deployed apps.
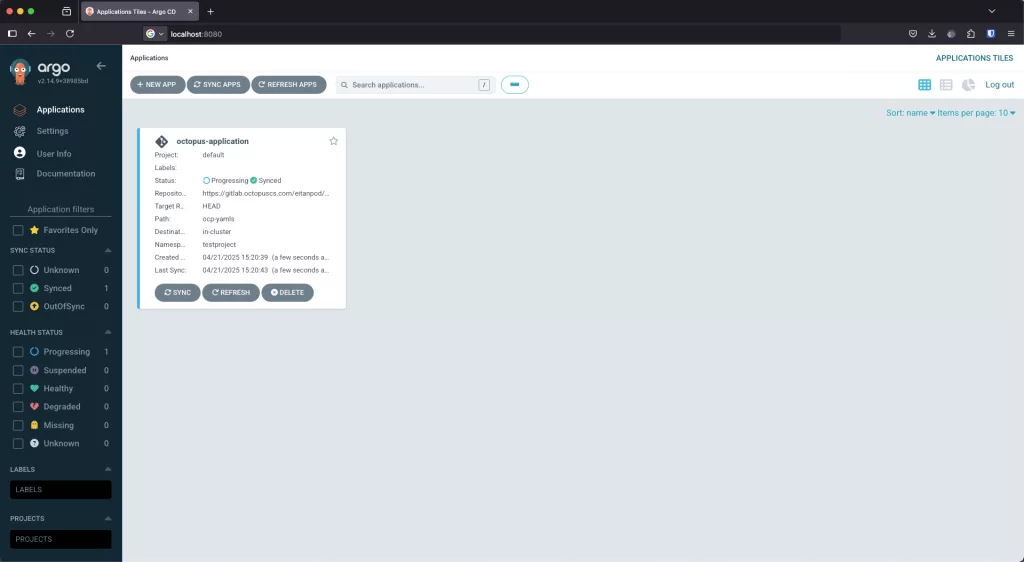
This visual confirmation ensures everything is synchronized and functioning as expected, completing your CI/CD pipeline setup.
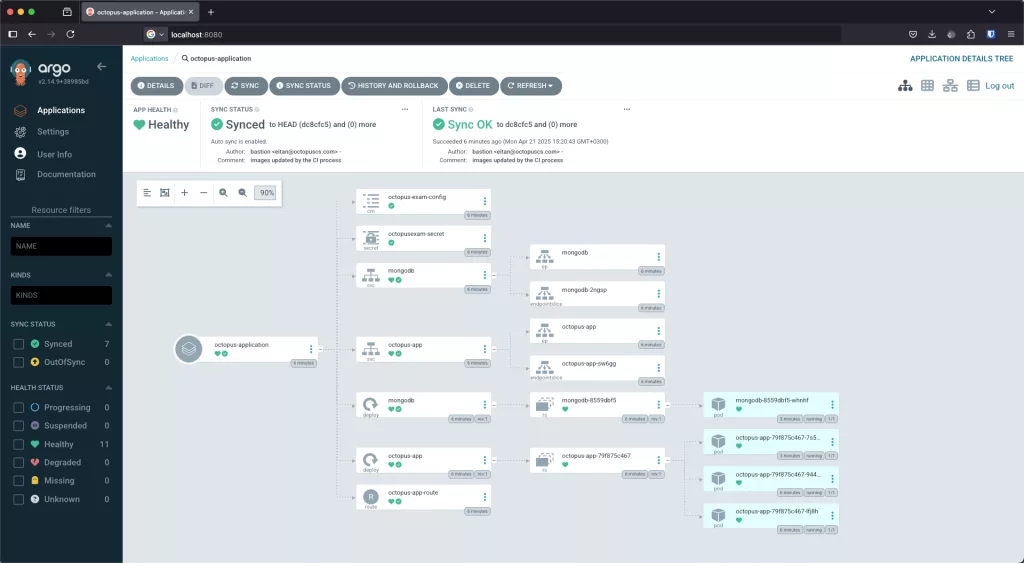
You can run
kubectl get deployments,services -n testprojectto see the services and deployments running as shown in the ArgoCD UI.

With this, your application is fully managed by ArgoCD, continuously synced from your Git repository.
Summary
In this guide, you learned how to configure ArgoCD to deploy applications using a GitOps approach. We covered how to connect private repositories, define an ArgoCD Application, and automate sync with your Kubernetes cluster. You also saw how to monitor your application through the Argo UI and ensure everything is running as expected.
If you haven’t already, make sure to check out our guide on setting up CI process: Create a CI/CD Process Using GitLab and ArgoCD? Part 1 to complete your DevOps pipeline!
For more Kubernetes guides check out Kubernetes page at k8s.co.il.