Introduction
In the following post we will show How to Deploy Kubernetes Using Kubespray. Kubespray is a powerful open-source project that simplifies the deployment, configuration, and life-cycle management of Kubernetes clusters. It leverages Ansible and supports multiple cloud platforms, making it an ideal choice for organizations seeking a flexible and customizable solution for their Kubernetes infrastructure.
In our guide we will deploy a production ready highly-available Kubernetes with HAProxy servers load balancing both data and API traffic into the environment with MetalLB , nginx ingress and more.
Prerequisites
Kubespray is a composition of Ansible playbooks, inventory, provisioning tools, and domain knowledge for generic OS/Kubernetes clusters configuration management tasks. As such there are a few prerequisites in order to deploy it.
- Minimum required version of Kubernetes is v1.22
- Ansible v2.11+, Jinja 2.11+ and python-netaddr is installed on the machine that will run Ansible commands
- The target servers must have access to the Internet in order to pull docker images. Otherwise, additional configuration is required See (Offline Environment)
- The target servers are configured to allow IPv4 forwarding.
- If using IPv6 for pods and services, the target servers are configured to allow IPv6 forwarding.
- The firewalls are not managed, you’ll need to implement your own rules the way you used to. in order to avoid any issue during deployment you should disable your firewall.
- If kubespray is run from non-root user account, correct privilege escalation method should be configured in the target servers. Then the ansible_become flag or command parameters –become or -b should be specified.
Procedure
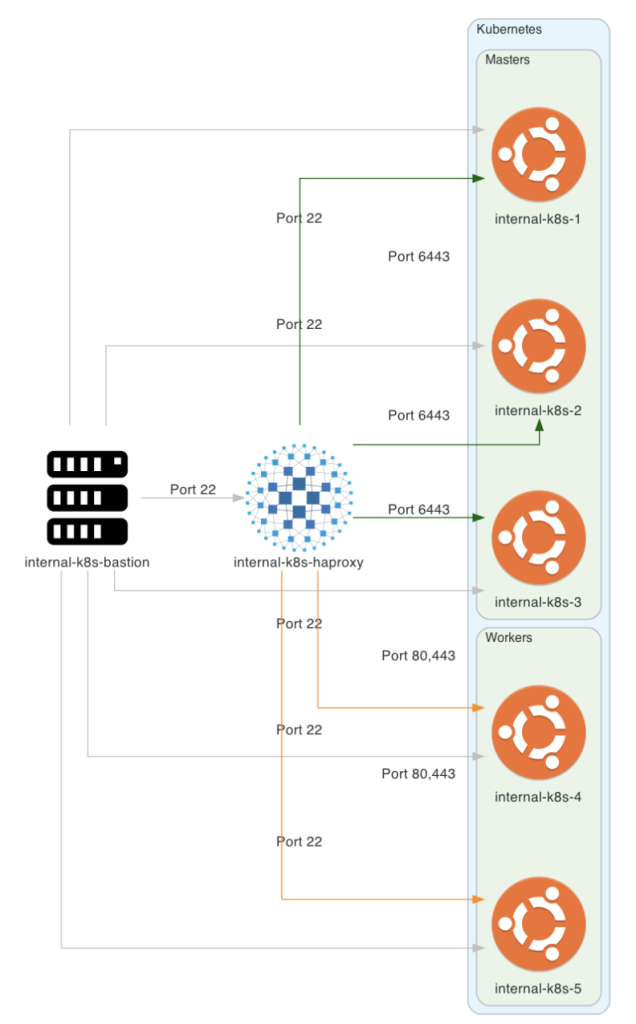
Architecture
In order to draw our architecture, we will use a wonderful python library called diagrams.
HAProxy Deployment
Install haproxy
$ apt update && apt upgrade
$ apt install haproxy
Configure HAProxy with haproxy.cfg on both servers:
$ mv /etc/haproxy/haproxy.cfg{,.orig}
$ vi /etc/haproxy/haproxy.cfg
Then fill haproxy.cfg with the following:
frontend kube-apiserver
  bind *:6443
  mode tcp
  option tcplog
  default_backend kube-apiserver

backend kube-apiserver
    mode tcp
    option tcp-check
    balance roundrobin
#    default-server inter 10s downinter 5s rise 2 fall 2 slowstart 60s maxconn 250 maxqueue 256 weight 100
    server internal-k8s-1 10.100.200.11:6443 check  # Replace the IP address with your own.
    server internal-k8s-2 10.100.200.12:6443 check  # Replace the IP address with your own.
    server internal-k8s-3 10.100.200.13:6443 check  # Replace the IP address with your own.

frontend kube-app-secure
  bind *:443
  mode tcp
  option tcplog
  default_backend kube-app-secure

backend kube-app-secure
   mode tcp
    option tcp-check
    balance roundrobin
    server internal-k8s-4 10.100.200.21:443 check  # Replace the IP address with your own.
    server internal-k8s-5 10.100.200.22:443 check  # Replace the IP address with your own.

frontend kube-app
  bind *:80
  mode tcp
  option tcplog
  default_backend kube-app

backend kube-app
    mode tcp
    option tcp-check
    balance roundrobin
    server internal-k8s-4 10.100.200.21:80 check  # Replace the IP address with your own.
    server internal-k8s-5 10.100.200.22:80 check  # Replace the IP address with your own.
Restart the service:
$ systemctl restart haproxyInstall Keepalived
In order to provide high availability to our cluster, we will use Keepalived with a VIP configuration.
Configure Keepalived both servers with following configurations:
$ vi /etc/keepalived/keepalived.confSERVER1 – 10.100.200.249
vrrp_script chk_haproxy {
  script " killall -0 haproxy"  # check the haproxy process
  interval 3 # every 2 seconds
  weight 2 # add 2 points if OK
}

vrrp_instance VI_1 {
  interface ens20 # interface to monitor
  state MASTER # MASTER on ha1, BACKUP on ha2
  virtual_router_id 51
  priority 101 # 101 on ha1, 100 on ha2
  advert_int 1
  virtual_ipaddress {
    10.100.200.254/16 # virtual ip address
  }
  track_script {
    chk_haproxy
  }
SERVER2 – 10.100.200.248
vrrp_script chk_haproxy {
  script " killall -0 haproxy"  # check the haproxy process
  interval 3 # every 2 seconds
  weight 2 # add 2 points if OK
}

vrrp_instance VI_1 {
  interface ens20 # interface to monitor
  state BACKUP # MASTER on ha1, BACKUP on ha2
  virtual_router_id 51
  priority 100 # 101 on ha1, 100 on ha2
  advert_int 1
  virtual_ipaddress {
    10.100.200.254/16 # virtual ip address
  }
  track_script {
    chk_haproxy
  }
Make sure no firewall is running
$ systemctl stop firewalld
$ firewall-cmd –list-all
$ systemctl stop iptables
$ iptables -L -n
Start and enable the keepalived service on both services.
$ systemctl enable keepalived
$ systemctl start keepalived
Bastion Preparations
Login to the bastion and run the following:
$ sudo apt install python3 python3-pipClone the kubespray repository
$ git clone https://github.com/kubernetes-sigs/kubespray.git
$ cd kubespray
$ sudo pip3 install --upgrade pip
$ sudo pip3 install -r requirements.txt
Create the inventory directory for the installation
$ cp -pr ./inventory/sample ./inventory/octopusKubespray provide a script to generate hosts.yaml file – but some changes are still needed
The following example are IP`s from the cluster we want to create – it includes worker/master nodes
$ declare -a IPS=(10.100.200.11 10.100.200.12 10.100.200.13 10.100.200.21 10.100.200.22)
$ CONFIG_FILE=inventory/runai/hosts.yaml python3 contrib/inventory_builder/inventory.py ${IPS[@]}
Add all masters & workers /etc/hosts
10.100.200.11 internal-k8s-1
10.100.200.12 internal-k8s-2
10.100.200.13 internal-k8s-3

10.100.200.21 internal-k8s-4
10.100.200.22 internal-k8s-5
Edit ./inventory/octopus/hosts.yaml
$ vi ./inventory/octopus/hosts.yamlNote: Please change the hosts name to meet your requirement: In this example i have 3 nodes dedicated for etcd.
all:
  hosts:
    internal-k8s-1:
      ansible_host: 10.100.200.11
      ip: 10.100.200.11
      access_ip: 10.100.200.11
    internal-k8s-2:
      ansible_host: 10.100.200.12
      ip: 10.100.200.12
      access_ip: 10.100.200.12
    internal-k8s-3:
      ansible_host: 10.100.200.13
      ip: 10.100.200.13
      access_ip: 10.100.200.13
    internal-k8s-4:
      ansible_host: 10.100.200.21
      ip: 10.100.200.21
      access_ip: 10.100.200.21
    internal-k8s-5:
      ansible_host: 10.100.200.22
      ip: 10.100.200.22
      access_ip: 10.100.200.22
  children:
    kube_control_plane:
      hosts:
        internal-k8s-1:
        internal-k8s-2:
        internal-k8s-3:
    kube_node:
      hosts:
        internal-k8s-1:
        internal-k8s-2:
        internal-k8s-3:
        internal-k8s-4:
        internal-k8s-5:
    etcd:
      hosts:
        internal-k8s-1:
        internal-k8s-2:
        internal-k8s-3:
    k8s_cluster:
      children:
        kube_control_plane:
        kube_node:
    calico_rr:
      hosts: {}
Add sudo capabilities for ssh user (in our case master)
$ ssh internal-k8s-1 -l master
$ sudo echo "master ALL=(ALL) NOPASSWD: ALL" >> /etc/sudoers.d/master
Enable IPv4 forwarding by running the following line on each host
$ sudo echo "net.ipv4.ip_forward=1" >> /etc/sysctl.conf
$ sysctl -p
Make sure ssh is working without a password
$ ssh-copy-id master@internal-k8s-1 <- for passwordless sshIn case default values does not meet your requirements – feel free the change the following:
$ vi inventory/octopus/group_vars/k8s_cluster/addons.ymlhelm_enabled: true
dashboard_enabled: true
metrics_server_enabled: true
metallb_enabled: true
metallb_speaker_enabled: "{{ metallb_enabled }}"
metallb_ip_range:
- "10.100.200.100-10.100.200.199"
metallb_protocol: "layer2"
ingress_nginx_enabled: true
ingress_nginx_host_network: false
ingress_publish_status_address: "" # this is by defaultSelect the version/network plugin – Currently the stable we chose is 1.24.8 for us.
$ vi inventory/octopus/group_vars/k8s_cluster/k8-cluster.ymlkube_version: v1.24.8
kube_network_plugin: calico
kube_network_plugin_multus: true
container_manager: crio
kube_proxy_strict_arp: true
kubeconfig_localhost: true
cluster_name: cluster.localKubespray Installation
Make sure servers are available. Test connectivity using the ansible ping modules.
$ ansible -i inventory/hotmobile/hosts.yaml all -m ping -b -u master | grep SUCCESSInstall the cluster
$ ansible-playbook -i inventory/hotmobile/hosts.yaml cluster.yml -u master -bKubernetes Day2 Operations
Multus workaround
With the cluster deployed, update the Multus daemonset
$ kubectl edit ds kube-multus-ds-amd64 -n kube-systemUpdate the arguments to use –cni-version=0.3.1 instead of –cni-version=0.4.0 as shown below:
      - args:
        - --cni-conf-dir=/host/etc/cni/net.d
        - --cni-bin-dir=/host/opt/cni/bin
        - --multus-conf-file=auto
        - --multus-kubeconfig-file-host=/etc/cni/net.d/multus.d/multus.kubeconfig
        - --cni-version=0.3.1
Additional Day2 Operations
Here you can add your additional deployments for day2 requirements like certificates with Manage your certificates with cert-manager and Let’s Encrypt or storage with
Summary
This concludes our post on how to Deploy Kubernetes Using Kubespray. At Octopus, we are passionate about leveraging open-source technologies, such as Kubespray, to optimize Kubernetes infrastructure. Our unique understanding of challenges you are facing allows us to provide tailored solutions that align with business objectives. This is unique in the industry, especially in complex and air-gapped environments . This ensures that we can help any customer navigate the intricacies of Kubernetes deployments and more.
Enjoy.