Introduction
In this post we will learn How vCluster enhances Kubernetes with Isolation and Security. It allows you to create isolated virtual clusters within your existing Kubernetes environment, making it easier to manage CI/CD pipelines, test new Kubernetes versions, and enhance your security. With vCluster, you can innovate without risk or experiment without affecting your production environment.
Architecture Design Example
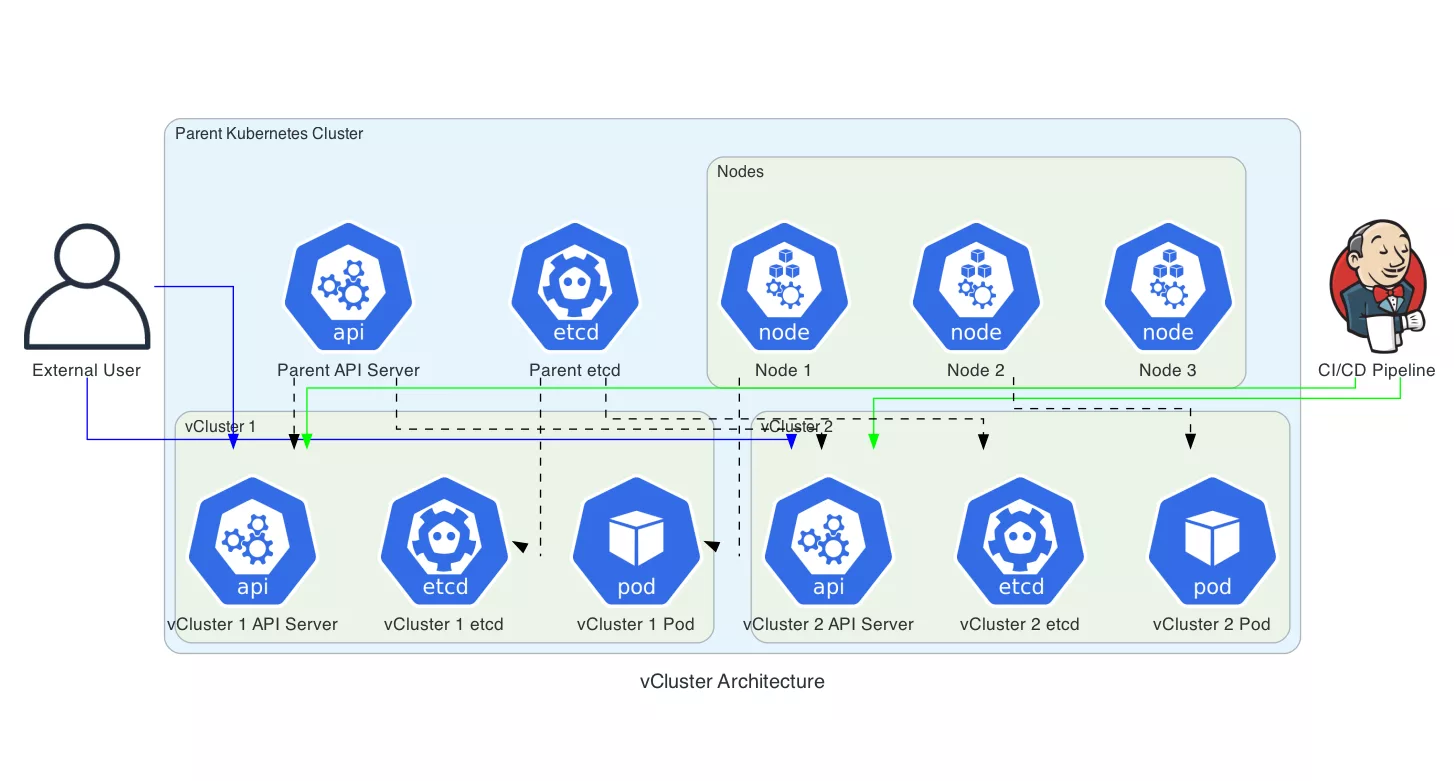
As usual we are using Diagrams as a tool to demonstrate the architecture. In the following example we see a vCluster deployment example on Kubernetes environment.

Note: If you’re interested in the code, see the appendix section below.
Procedure
Install Helm if you haven’t installed it until now:
$ curl https://raw.githubusercontent.com/helm/helm/main/scripts/get-helm-3 | bashInstall via helm
$ helm repo add loft-sh https://charts.loft.sh
$ helm repo update
Install vCluster
$ kubectl create namespace vcluster
$ helm install my-vcluster loft-sh/vcluster --namespace vcluster
Connect to the cluster
$ vcluster connect my-vcluster --namespace vclusterVerify the internal cluster deployment:
$ kubectl get nodes
$ kubectl version
We can use vCluster for several use cases.
- Atomic CI/CD Pipelines with vCluster
- Enhanced Security and Compliance
- Comprehensive Kubernetes Training and Testing
And more..
USE CASE 1 – Atomic CI/CD Pipelines Example with vCluster
Here’s an example of a gitlab CI that will create a vCluster to test some functionality and destroy it when done.
NOTE: Before proceeding, ensure that you have a GitLab Runner set up with the Kubernetes executor on your parent Kubernetes cluster. The runner will spin up pods to run the CI/CD jobs
.gitlab-ci.yml
image: alpine:latest

stages:
  - create_vcluster
  - deploy
  - test
  - teardown

variables:
  VCLUSTER_NAME: "ci-vcluster"
  NAMESPACE: "ci-vcluster"

create_vcluster:
  stage: create_vcluster
  image: bitnami/kubectl:latest
  script:
    - kubectl create namespace $NAMESPACE || true
    - helm repo add loft-sh https://charts.loft.sh
    - helm repo update
    - helm install $VCLUSTER_NAME loft-sh/vcluster --namespace $NAMESPACE
    - vcluster connect $VCLUSTER_NAME --namespace $NAMESPACE --update-current --detach

deploy:
  stage: deploy
  image: bitnami/kubectl:latest
  script:
    - kubectl apply -f deployment.yaml

test:
  stage: test
  image: bitnami/kubectl:latest
  script:
    - kubectl run test-runner --image=my-test-image -- /bin/sh -c "run-tests.sh"

teardown:
  stage: teardown
  image: bitnami/kubectl:latest
  script:
    - helm uninstall $VCLUSTER_NAME --namespace $NAMESPACE
    - kubectl delete namespace $NAMESPACE || true

kubernetes:
  stage: create_vcluster
  image: bitnami/kubectl:latest
  script:
    - kubectl config set-cluster $KUBERNETES_CLUSTER --server=https://kubernetes.default.svc
    - kubectl config set-credentials gitlab-ci --token=$KUBERNETES_TOKEN
    - kubectl config set-context gitlab-ci --cluster=$KUBERNETES_CLUSTER --user=gitlab-ci
    - kubectl config use-context gitlab-ci
How to Use
- Set up GitLab Runner with Kubernetes executor on your parent cluster.
- Ensure your GitLab Runner has permissions to create, manage, and delete namespaces and pods in the Kubernetes cluster.
- Add the
.gitlab-ci.ymlfile to the root of your repository and push the changes.
This setup will run the entire CI/CD pipeline inside pods on your parent Kubernetes cluster, ensuring that no external bastion is required. The pipeline creates a vCluster for each run, deploys the application, runs tests, and tears down the environment, all within the isolated virtual cluster.
USE CASE 2 – Enhanced Security and Compliance
vCluster is a great solution for organizations that need to maintain strict security and compliance standards, especially in multi-tenant Kubernetes environments. Here’s an example of how to use vCluster to enhance security and compliance:
Isolated vClusters per Tenant or Team.
Here is an for different departments, Finance, Billing and Patient Care.to assist in HIPAA Compliance
Finance Department:
We create a vCluster for the finance tea. With access only to finance team (RBAC), from the headquarters of the company(NetworkPolicy) and for specific services to be able to run on the vCluster(PodSecurityPolicy). Here are the commands to create the vCluster.
$ kubectl create namespace finance-team
$ helm install finance-vcluster loft-sh/vcluster --namespace finance-team
$ vcluster connect finance-vcluster --namespace finance-team
Apply Security Policies at the vCluster Level. This will be done on the main Kubernetes.
- Network policies: Limit communication between services running within the vCluster.
- Role-based Access Control (RBAC): Define fine-grained permissions for users interacting with the vCluster.
- Pod security policies: Restrict which containers and pods are allowed to run based on security requirements.
NOTE: We won’t go into detail to example what is each object in this guide.
Billing Department: – With the same idea as above, we can create another vCluster for the billing team with restricted access to patient records. We can also apply RBAC policies to ensure that the billing team can only access financial data.
Patient Care Department: – Again, we create another vCluster for the patient care team that allows access to patient medical records but restricts access to financial data.
You can apply Network Policies, RBAC and pod security policies for these department as well like to the finance department.
Auditing and logging
Data compliance standards like GDPR and HIPAA require careful control over where and how data is stored and processed. For example, Enable auditing on each vCluster’s API server to track who accesses sensitive data and ensure logs are stored in a compliant manner.
Secure Data Access Across Multiple vClusters
Security Benefits of vCluster:
- Workload Isolation: Each team or department can have their own isolated Kubernetes environment with no risk of interfering with other environments.
- Data Segregation: Separate control planes ensure that sensitive data (e.g., patient data or financial data) is isolated and only accessible by authorized personnel. This is a better isolation than namespace only when not using vCluster.
- Compliance Enforcement: Easily implement and audit compliance controls specific to each vCluster, making it simpler to adhere to regulations like GDPR, HIPAA, or PCI-DSS.
USE CASE 3 – Comprehensive Kubernetes Training and Testing
Suppose you are hosting a Kubernetes workshop for a team of developers. You need to provide each participant with their own Kubernetes environment where they can learn, practice, and run tests without affecting others. The environment needs to be isolated, quick to create, and scalable for a large number of users. Usually we are using Kind for it. See Deploying Harbor Kind and Helm Charts
Challenges with Kind (Kubernetes-in-Docker)
- Resource Overhead: Each instance of kind runs as a separate Docker container, which consumes considerable system resources (CPU, memory, disk). A VM per student.
- Lack of Flexibility: kind operates at the node level, so each user gets a single-node Kubernetes cluster. This is not always representative of a real-world multi-node Kubernetes cluster.
- Complex Cluster Setup: Setting up and managing multiple kind clusters for many users requires significant overhead for the IT team and isn’t always automatic.
Why vCluster Is Better for Kubernetes Training and Testing
With vCluster, you can create isolated virtual Kubernetes clusters for each participant within a parent Kubernetes cluster. Here’s how vCluster simplifies training and testing:
1. Lower Resource Usage
vCluster runs virtual Kubernetes clusters inside an existing parent cluster. These virtual clusters share the underlying resources (nodes, CPU, memory) of the parent cluster, which reduces overhead compared to kind, where each instance is a separate Docker container.
2. Multi-Node Simulation
vCluster allows you to simulate multi-node environments within a virtual cluster, offering a more realistic Kubernetes experience
3. Easy Scaling and Isolation
With vCluster, creating multiple virtual clusters for different participants is as simple as running Helm commands. Each vCluster is fully isolated, so users can experiment, break things, and reset without affecting others. You can easily scale to hundreds of users with minimal resource overhead.
Create a Virtual Cluster for Each Participant
The instructions are the same as for the other use cases, but i’ll write those down anyways:
1. Create the vCluster for participant1
$ kubectl create namespace participant1
$ helm install participant1-vcluster loft-sh/vcluster --namespace participant1
Expose the vCluster to the participant:
apiVersion: v1
kind: Service
metadata:
  name: vcluster-api
  namespace: participant1
spec:
  type: NodePort
  ports:
    - port: 6443
      targetPort: 8443
      nodePort: 30001
  selector:
    app.kubernetes.io/name: vcluster
This will expose port 30001 for the user.
Note: If you’re using a cloud Kubernetes provider like GKE, EKS, or AKS, you can use a
LoadBalancertype service instead to expose the API server with an external IP address.Example for MetalLB on on-premise environment:
apiVersion: v1
kind: Service
metadata:
  name: vcluster-api
  namespace: participant1
spec:
  type: LoadBalancer
  ports:
    - port: 6443      # The port on which the vCluster API server listens
      targetPort: 8443 # Target port inside the vCluster
  selector:
    app.kubernetes.io/name: vcluster
Retrieve the service and ip:
$ kubectl get svc vcluster-api -n participant1Output:
NAME            TYPE           CLUSTER-IP     EXTERNAL-IP     PORT(S)          AGE
vcluster-api    LoadBalancer   10.0.0.1       192.168.1.100   6443:30901/TCP   1m
The
EXTERNAL-IPfield (192.168.1.100in this example) is the IP address that participants will use to connect to the vCluster.
2. Generate Kubeconfig for the User
Once the vCluster API server is exposed, create a dedicated kubeconfig file for the participant to connect to the vCluster.
First, connect to the vCluster:
$ vcluster connect participant1-vcluster --namespace participant1Then, create a ServiceAccount and bind the necessary roles:
$ kubectl create serviceaccount participant1-sa -n default
$ kubectl create clusterrolebinding participant1-admin-binding --clusterrole=cluster-admin --serviceaccount=default:participant1-sa
Get the ServiceAccount Token: Once the ServiceAccount is created, get the authentication token that will be used in the kubeconfig:
SECRET_NAME=$(kubectl get serviceaccount participant1-sa -o jsonpath='{.secrets[0].name}' -n default)
TOKEN=$(kubectl get secret $SECRET_NAME -o jsonpath='{.data.token}' -n default | base64 --decode)
Create the Kubeconfig File: You can now create a kubeconfig file for the participant:
Note: If you are using LoadBalancer, then instead of
https://<node-ip>:30001usehttps://EXTERNAL-IP:6443in the following example:
apiVersion: v1
kind: Config
clusters:
- cluster:
    certificate-authority-data: <CA_DATA_FROM_VCLUSTER>
    server: https://<node-ip>:30001  # Replace with the exposed vCluster API address
  name: participant1-vcluster
contexts:
- context:
    cluster: participant1-vcluster
    user: participant1-user
  name: participant1-context
current-context: participant1-context
users:
- name: participant1-user
  user:
    token: <TOKEN>  # Replace with the token retrieved earlier
Distribute the Kubeconfig: Share the generated kubeconfig file with participant1. They can use it to access their vCluster using standard kubectl commands:
$ kubectl --kubeconfig=participant1-kubeconfig.yaml get pods3. Apply RBAC for Participant’s Access
To ensure the participant only has access to their vCluster, we should set up RBAC policies that limit their access to the vCluster namespace only. Here’s how:
Create Role and RoleBinding
apiVersion: rbac.authorization.k8s.io/v1
kind: Role
metadata:
  namespace: default
  name: participant1-role
rules:
- apiGroups: [""]
  resources: ["pods", "services", "deployments"]
  verbs: ["get", "list", "create", "delete", "update"]
---
apiVersion: rbac.authorization.k8s.io/v1
kind: RoleBinding
metadata:
  name: participant1-binding
  namespace: default
subjects:
- kind: ServiceAccount
  name: participant1-sa
  namespace: default
roleRef:
  kind: Role
  name: participant1-role
  apiGroup: rbac.authorization.k8s.io
With these steps, participant1 will have direct access to their vCluster without needing to use the vcluster connect command, ensuring that they have an isolated Kubernetes environment while maintaining security, high-availability and resource isolation.
Summary
vCluster is a valuable addition to your Kubernetes toolkit. We saw How vCluster enhances Kubernetes with Isolation and Security. It’s a great option for our customers, whether you’re a CI/CD pipelines developer, managing different Kubernetes versions, or in need for ensuring a secure environment, vCluster makes the process easy and effective. At Octopus Computer Solutions, we use vCluster to help our clients achieve more advanced and secure operations with their Kubernetes environment. Feel free to read more of our Kubernetes Security Posts or expand your understanding of this technology at vCluster Docs.
Appendix A – Diagrams Code
As promised here is the diagrams code for the architecture image above:
from diagrams import Diagram, Cluster, Edge
from diagrams.k8s.compute import Pod
from diagrams.k8s.controlplane import API
from diagrams.k8s.infra import ETCD, Node
from diagrams.onprem.ci import Jenkins
from diagrams.onprem.client import User

with Diagram("vCluster Architecture", show=False, direction='TB'):

    user = User("External User")
    ci_cd = Jenkins("CI/CD Pipeline")

    with Cluster("Parent Kubernetes Cluster"):
        parent_api = API("Parent API Server")
        parent_etcd = ETCD("Parent etcd")

        with Cluster("Nodes"):
            node1 = Node("Node 1")
            node2 = Node("Node 2")
            node3 = Node("Node 3")

        with Cluster("vCluster 1"):
            vcluster1_api = API("vCluster 1 API Server")
            vcluster1_etcd = ETCD("vCluster 1 etcd")
            vcluster1_pod = Pod("vCluster 1 Pod")

        with Cluster("vCluster 2"):
            vcluster2_api = API("vCluster 2 API Server")
            vcluster2_etcd = ETCD("vCluster 2 etcd")
            vcluster2_pod = Pod("vCluster 2 Pod")

    user >> Edge(color="blue") >> vcluster1_api
    user >> Edge(color="blue") >> vcluster2_api

    ci_cd >> Edge(color="green") >> vcluster1_api
    ci_cd >> Edge(color="green") >> vcluster2_api

    parent_api >> Edge(color="black", style="dashed") >> vcluster1_api
    parent_api >> Edge(color="black", style="dashed") >> vcluster2_api

    parent_etcd >> Edge(color="black", style="dashed") >> vcluster1_etcd
    parent_etcd >> Edge(color="black", style="dashed") >> vcluster2_etcd

    node1 >> Edge(color="black", style="dashed") >> vcluster1_pod
    node2 >> Edge(color="black", style="dashed") >> vcluster2_pod


