Introduction
In this article you will learn how to create a simple “hot-cold” app in Python, use docker for containerazation, and finally deploy your app using kubernetes.
We will use Kind to build our k8s cluster, we will learn how to do save our docker image inside Harbor image registry, and how to install our app’s k8s files using helm chart.
This artictle demonstrates the way from building the app, all the way to deployment.
Perequisites
- Python (Check out Python installation guide)
- Kubectl (Check out Kubectl installation guide)
- Kind (Check out Kind installation guide)
- Docker (Check out Docker installation guide)
Hot-Cold Python app
For this demonstration we will create a simple hot-cold up using Python. Our app will contain two simple html pages: hot and cold. Each time we will get a different page. To create this app we will use Flask library from Python, this library is useful to build websites using Python language.
So let’s get started by creating the app.
Setting up a virtual environment
Before diving into our source code, it is best practice to develop the app inside a virtual environment, so it will be easy for us to deal with our app’s dependicies later.
# To create a new environment run the command:
python -m venv .venv

# To activate and enter the environment run:
source .venv/bin/activate
Source code:
# Importing Flask and rndom libreries
from flask import Flask, render_template
import random

# Creating the app
app = Flask(__name__)

@app.route("/")
def home():
    template = random.randint(1,2)
    if template == 1:
        return render_template("hot.html")

    return render_template("cold.html")


if __name__ == '__main__':
    app.run(debug=True)
To be able to randomly show a different page each time, we will use the help of the random library. We will generate a random number: 1 or 2, and according to each resault we respond with hot or cold page


Docker
Docker Engine is an open source containerization technology for building and containerizing your applications.
Docker has two main attributes, images and containers.
We can imagine that an image is like a recepy and the container is like the cake. We create containers out of images.
Dockerfile:
FROM python:slim

WORKDIR /app

RUN apt-get update

COPY requirements.txt .

RUN pip install --no-cache-dir -r requirements.txt

COPY . .

EXPOSE 5000

CMD gunicorn --bind 0.0.0.0:5000 app:app
Now we need to build the image.
# Run the command:
docker build -t hot-cold-image .

# To check the new image run:
docker images
If everytrhing went according to plan you will see the next screen:

Creating K8S Cluster Using Kind
Now we are getting into the interesting part, setting up our k8s cluster. To perform that we will use kind.
Kind is an open-source, CNCF-certified Kubernetes installer used by developers to quickly and easily create Kubernetes clusters using Docker container.
Creating the k8s cluster
To download the cluster configuration run:wget https://gist.githubusercontent.com/purushothamkdr453/39e097ce8ea62efbf28d8badebcbf5dd/raw/eab80fba4afdab26a3a9398d5ba59d383aad27ae/kind-single-controlplane-multiple-worker.yaml
To create the cluster run:kind create cluster --config kind-single-controlplane-multiple-worker.yaml
Helm
Helm is a package manager for k8s. This is our way to package all the yaml files we need to run our app, insert everything to one place, and install it. This is the helm chart.
Let’s start by downloading helm.sudo dnf install helm
Note: we will use helm later on, we need it to be installed for our next services.
Harbor
So what is Harbor? Harbor is a local registry that can be installed inside our k8s cluster. It can contain docker images and podman images as well.
So let’s start our journey with harbor.
Installing MetalLB
What is metallb? MetalLB assigns IP addresses to services (applications) within Kubernetes, providing load balancing functionality similar to what cloud providers offer.
# To install run:
kubectl apply -f https://raw.githubusercontent.com/metallb/metallb/v0.13.7/config/manifests/metallb-native.yaml
# Run this command to check pods and wait untill they are all up:
k get pods -n metallb-system

# Now we need to check our docker kind cidr, so metalb will use a pool to give us ip.
# Run the command:
docker network inspect -f '{{.IPAM.Config}}' kind
In my case the output will contain a cidr such as 172.18.0.0/16. You need to apy attention to the output and create a metallb-config.yaml accordingly.
apiVersion: metallb.io/v1beta1
kind: IPAddressPool
metadata:
  name: example
  namespace: metallb-system
spec:
  addresses:
  - 172.18.255.200-172.18.255.250
---
apiVersion: metallb.io/v1beta1
kind: L2Advertisement
metadata:
  name: empty
  namespace: metallb-system
Apply the above manifest file:kubectl apply -f metallb-config.yaml
Installing Harbor
First we need to download the harbor helm repo:
helm repo add bitnami https://charts.bitnami.com/bitnami
helm repo update
Next, create a values.yaml file as following:
externalURL: https://harbor-ds.octopus.lab
adminPassword: "admin"
nginx:
  tls:
    commonName: harbor-ds.octopus.lab
Note: change the domain to yours.
# Download the helm chart:
helm install harbor bitnami/harbor -n harbor -f values.yaml --create-namespace

# Run the following command to get the external IP:
kubectl get svc -n harbor

# In my case harbor service loadbalancer ip is -> 172.18.255.200.
# Go to your /etc/hosts and assign the domain from earlier to the ip you got.
vi /etc/hosts

# Add the following line
172.18.255.200 harbor-ds.octopus.lab
Try to get to the harbor wesite with your domain, enter the username: admin and the password you chose in the values.yaml file.
Harbor Project
After you reached the website, create a new project and name it as you like.
Now tag your image:docker tag dshwartzman5/hot-cold-app:latest harbor-ds.octopus.lab/hot-cold-registry/hot-cold-app:latest
If we try to push the image at this stage, we will get an error. This is due to the fact that docker expects registries to have valid SSL certificates signed by a trusted Certificate Authority (CA). However, when using self-signed certificates, Docker considers the registry as insecure.
Create daemon.json file:
mkdir -p /etc/docker/
vi /etc/docker/daemon.json

{
    "insecure-registries" : [ "harbor-ds.octopus.lab" ]
}
Restart Docker and reload Deamon:
systemctl daemon-reload
systemctl restart docker
Login to harbor from CLI:docker login harbor-ds.octopus.lab
Note: use the username and password from before
Push the Image:docker push harbor-ds.octopus.lab/hot-cold-registry/hot-cold-app
To access harbor we need to enter via HTTPS. We have a CA certificate inside our registry. Download from the registry and copy the CA certificate to all of our nodes:
# Control Plane
docker cp /home/ortuser19/Downloads/ca.crt cluster1-control-plane:/etc/ssl/certs
docker exec cluster1-control-plane update-ca-certificates
docker exec cluster1-control-plane systemctl restart containerd

# Worker1
docker cp /home/ortuser19/Downloads/ca.crt cluster1-worker:/etc/ssl/certs
docker exec cluster1-worker update-ca-certificates
docker exec cluster1-worker systemctl restart containerd

# Worker2
docker cp /home/ortuser19/Downloads/ca.crt cluster1-worker2:/etc/ssl/certs
docker exec cluster1-worker2 update-ca-certificates
docker exec cluster1-worker2 systemctl restart containerd

# Worker3
docker cp /home/ortuser19/Downloads/ca.crt cluster1-worker3:/etc/ssl/certs
docker exec cluster1-worker3 update-ca-certificates
docker exec cluster1-worker3 systemctl restart containerd
Nginx Ingress Controller
So what is ingress? The purpose of ingress is to control the traffic from outside to inside our cluster. Ingress has rules, who can enter and who doesn’t and ingress controller is the thing that enforces those rules and helps to manage the traffic, ensuring traffic get smoothly to the right destination.
# First we need to download the nginx controller helm chart:
helm pull oci://ghcr.io/nginxinc/charts/nginx-ingress --untar --version 1.1.3

# Change your working directory to nginx-ingress:
cd nginx-ingress

# Download CRDs:
kubectl apply -f crds/

# Install the helm chart:
helm install my-release oci://ghcr.io/nginxinc/charts/nginx-ingress --version 1.1.3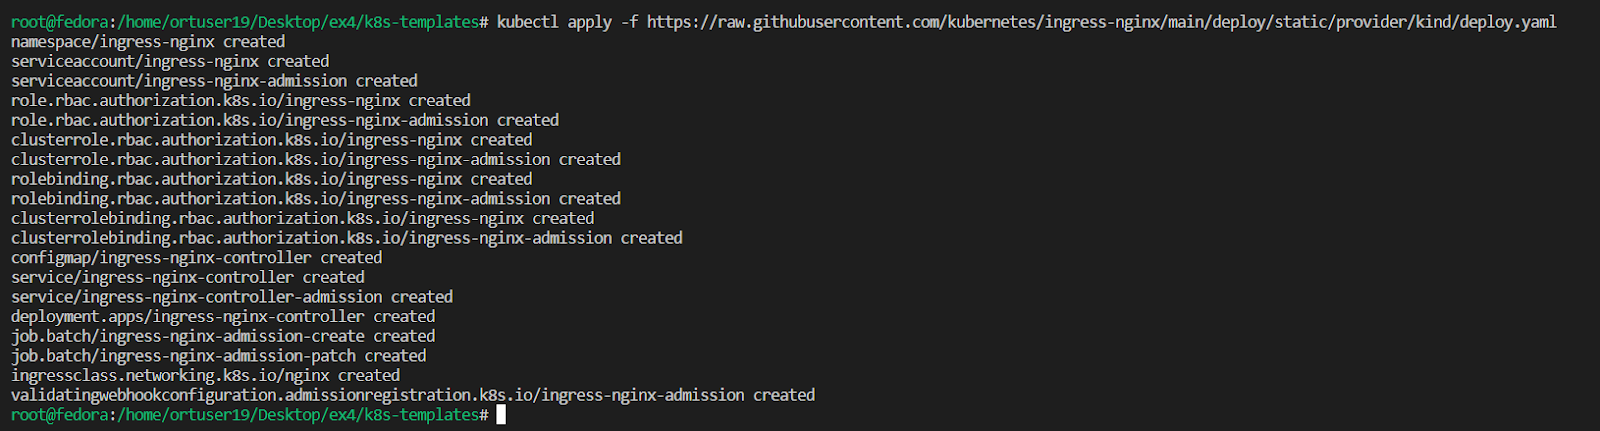
Now, after nginx ingress controllwe is installed, we can modify /etc/hosts file again, but this time we need to add the domain for our website.
# Run the following command to get the extertnal IP of our app:
kubectl get svc

# Open the /etc/hosts file :
vi /etc/hosts

# Add the following :
172.18.255.201 ds-hot-cold-app.octopus.lab
Note: The IP address above can be different for each user.
Helm Chart
After a successfull installation we need to create an helm chart.
Run the command:helm create app
This will create us a new folder by the name app. If you would like you can see the default content of the folder.
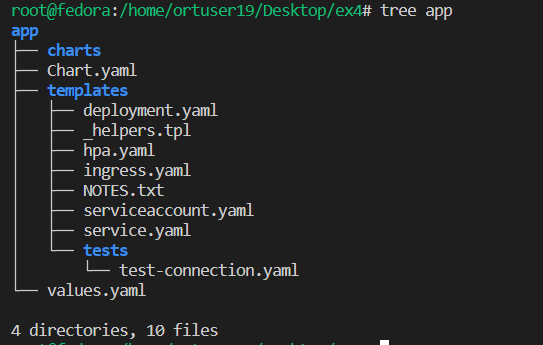
Next, we will edit the values.yaml file. This file helps us to store repeated values along the files and we can access those values from one central place. Afterwards we will create 4 crucial files the help us deploy our app.
values.yaml:
# Default values for app.
# This is a YAML-formatted file.
# Declare variables to be passed into your templates.

namespace:
  name: hot-cold-app # The name of the namespace to deploy the app into

app:
  replicaCount: 1 # Number of replicas to deploy
  image:
    name: harbor-ds.octopus.lab/hot-cold-registry/hot-cold-app  # The name of the image to deploy
    tag: latest # The tag of the image to deploy
namespace.yaml:
This file creates as a namespace. Namespace is a logical environment that we can use to grant rules and centerlize our k8s services that are related.
apiVersion: v1 # Setting the API version
kind: Namespace # Defining the kind of resource
metadata:
  name: {{ .Values.namespace.name }} # Setting the name of the namespace from the values file
deployment.yaml:
A deployment in Kubernetes manages a set of identical pods, ensuring availability and scaling according to defined specifications.
apiVersion: apps/v1 # Setting the API version
kind: Deployment # Setting the kind of the resource
metadata:
  name: hot-cold-deployment # Setting the name of the deployment
  namespace: {{ .Values.namespace.name }} # Setting the namespace of the deployment
  labels:
    app: hot-cold-app # Setting the label of the deployment
spec:
  replicas: {{ .Values.app.replicaCount }} # Setting the number of replicas
  selector:
    matchLabels:
      app: hot-cold-app # Ensuring the selector matches the label of the deployment
  template: # Setting the template of the deployment
    metadata:
      labels:
        app: hot-cold-app # Ensuring the label of the pod matches the label of the deployment
    spec:
      containers:
      - name: hot-cold-app # Setting the name of the container
        image: "{{ .Values.app.image.name }}:{{ .Values.app.image.tag }}" # Setting the image of the container
        ports:
        - containerPort: 5000 # Setting the port of the container
service.yaml:
A service in Kubernetes is enabling network communication, holds one static IP address to all the pods with the same label.
apiVersion: v1 # Setting the version of the API
kind: Service # The kind of resource we are creating
metadata:
  namespace: {{ .Values.namespace.name }} # The namespace where the service will be created (from the values.yaml file)
  name: hot-cold-service # The name of the service
  labels:
    app: hot-cold-app # The label of the service (used to match the service with the deployment)
spec:
  ports:
  - port: 80 # The port that the service will listen on
    targetPort: 5000  # The port that the service will forward requests to
  selector:
    app: hot-cold-app # The label of the service (used to match the service with the deployment)
ingress.yaml:
This file helps us to define the rules for the ingress. For example: the accessable domain, the port the traffic will be sent to and etc.
apiVersion: networking.k8s.io/v1 # Setting the API version
kind: Ingress # Setting the kind
metadata:
  namespace: {{ .Values.namespace.name }} # Setting the namespace
  name: hot-cold-ingress # Setting the name of the ingress
  annotations:
    kubernetes.io/ingress.class: "nginx" # Setting the ingress class
spec:
  rules:
  - host: ds-hot-cold-app.octopus.lab # Setting the domain (taken from /etc/hosts)
    http:
      paths:
      - path: / # Setting the path(homepage)
        pathType: Prefix
        backend:
          service:
            name: hot-cold-service # Ensuring the service matches the service name
            port:
              number: 80 # Setting the port number traffic will be sent to
Now we have everything set up and we can install our own app!!!
Are you ready?
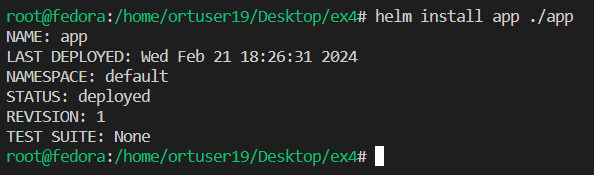
Run the command:helm install app ./app
Now you should see the following:
If you want to see the created resources run:kubectl get all -n hot-cold-app
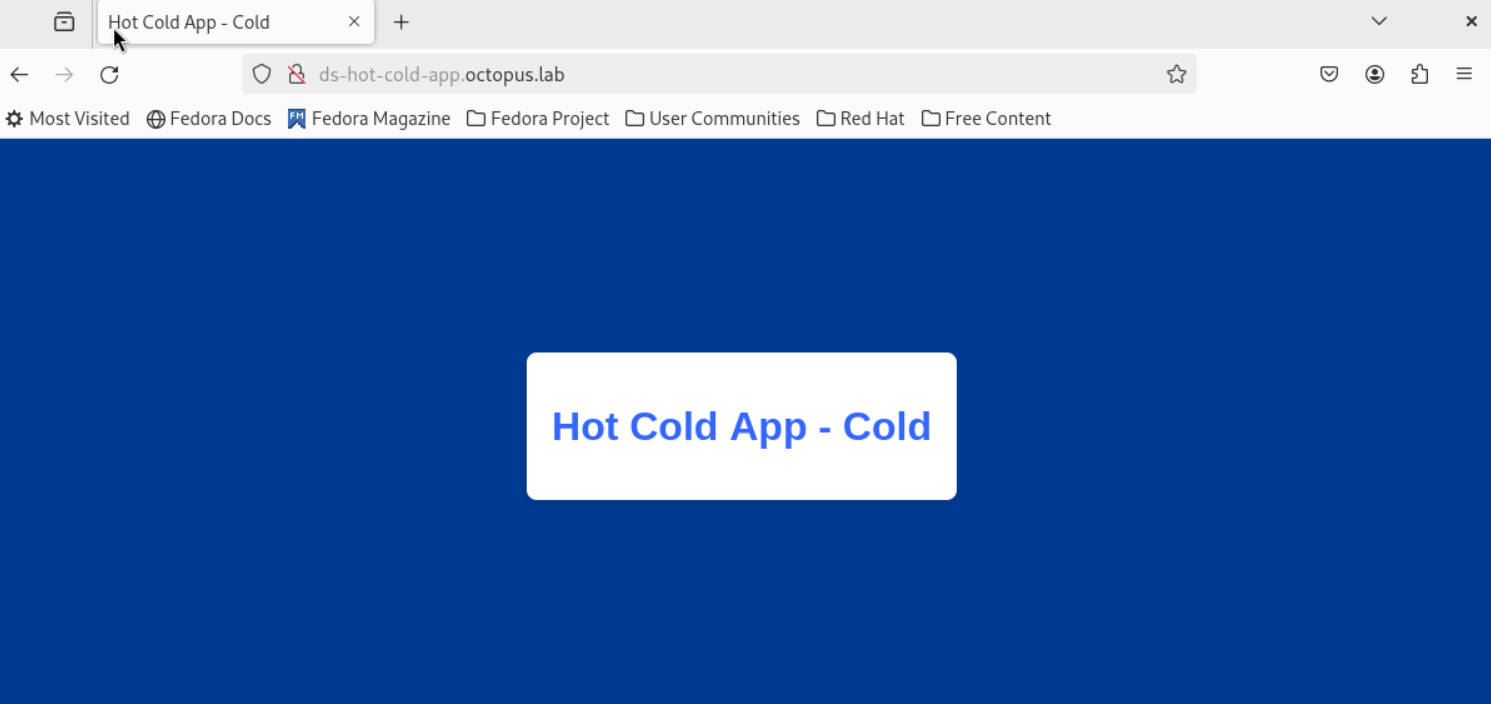
Now you can access your app through the domain.

Bounus Tip
If you are tired of typing kubectl every time, there is an easy way to make it slightly easier.
Go to .bachrc file in your home directory and add an alias to the kubectl command, and that is it.
vi ~/.bachrc
alias k='kubectl'
# restart your terminal after that
So there is a big relief, huh?
Summary
In this tutorial we learned how to create a simple python app, containerize it, and deply it using kubernetes and helm. In addition, we saw how to install kind and deploy our app with kind instead of dockerhub.
I hope this article was very helpful and helm you gain the basics of app deployment using k8s.