Introduction
Red Hat Advanced Cluster Management (ACM) for Kubernetes is a powerful tool that helps you manage your OpenShift and Kubernetes clusters at scale. However, in a disconnected environment, installing ACM requires additional steps. you need to mirror the necessary images and metadata from Red Hat’s container registries to a local registry. Therefore, this guide provides step-by-step instructions on How to install ACM on a disconnected OpenShift environment using the oc-mirror plugin and a local container image registry.
By using the oc-mirror plugin, you will simplify the process of mirroring images, as it enables you to pull all the necessary images and store them locally. As a result, you can install ACM even when disconnected from Red Hat’s container registries.
Prerequisites
1. Deploy a Running OpenShift Container Platform (OCP) Cluster
- Ensure it is in a latest version. At least 4.10 or later.
- The cluster must be deployed in a disconnected (air-gapped) environment.
2. Set Up a Bastion Machine in the Disconnected Environment
- This machine must have a local container image registry running, e.g., omer.registry.com:5000.
3. Install the oc CLI Tool on the Bastion Host
- The oc CLI is essential for interacting with the OpenShift cluster.
- To see how to download the oc command you can get info from this post: How to deploy single node in OpenShift. you can find this at the start of the post.
4. Prepare a Separate Machine with Internet Access
- This machine will be used to download container images and required resources from the internet.
- Since the main environment is disconnected, this external machine is necessary for initial setup.
5. Transfer Downloaded Content to the Bastion Host
- After downloading the necessary files on the internet-connected system, transfer them to the bastion machine in the disconnected environment.
6. Upload Resources to the Local Registry
- Use the bastion machine to upload images and resources to the local registry.
- These resources will then be available for the OpenShift cluster and any dependent components.
7. Proceed with Installation and Operations
With all required files and images available locally, proceed with installing and operating OpenShift within the disconnected environment.
Part 1 – How to Install and use the oc-mirror CLI Plugin
Step 1: oc-mirror command and create the config file
NOTE: Special Considerations for Disconnected Network Environments
In disconnected environments, you need to include the multicluster engine for Kubernetes in your mirrored operator catalog to install or upgrade the Red Hat Advanced Cluster Management.
By doing so, you ensure that all required dependencies are available during the installation process, thereby preventing potential failures or missing components.
To see how to use and install the oc-mirror plugin and create the config file use this guide:
do this step on the machine with the internet connection
Important: When you reach the step in the guide where you’re asked to create the ImageSetConfiguration CR, come back to this post to continue.
Guide link: oc-mirror plugin and config file by Octopus friend Hillay Amir
At the end of this guide, ensure that the config file includes both the ACM and multicluster engine operators, like the following example:
apiVersion: mirror.openshift.io/v1alpha2
kind: ImageSetConfiguration
archiveSize: 50
mirror:
  operators:
  - catalog: registry.redhat.io/redhat/redhat-operator-index:v4.14
    packages:
    - name: advanced-cluster-management
      channels:
      - name: release-2.11
        minVersion: '2.11.6'
        maxVersion: '2.11.6'
    - name: multicluster-engine
      channels:
      - name: stable-2.6
I used OCP 4.14 and ACM 2.11 because they’re are compatible and supported, so I chose them for stability and updates.
NOTE: From my hands-on experience with that, including the multicluster engine is extremely important in disconnected environments. Without it, missing components can stop the installation, and it’s not always obvious what’s missing until it’s too late. This method helps avoid those surprises by making sure all needed parts are already in place.
Running the mirror process with this command:
$ oc mirror --config=config.yaml file://<file_name>Step 2: Transfer Files to the Disconnected Environment
First, use the scp command to copy the oc-mirror-workspace directory from your online host to the disconnected environment.
$ scp -r oc-mirror-workspace user@disconnected-host:/path/Now, in the bastion machine do this command:
$ oc-mirror --from <mirror_file>.tar docker://<registry_fqdn>:<port>/"the name of the operator" --dest-skip-tlsStep 3: Apply the CatalogSource and the imageContentSourcePolicy on OpenShift
To apply the generated CatalogSource and ImageContentSourcePolicy YAML files to the cluster, follow these steps:
First, navigate to the directory containing the generated files:
$ cd oc-mirror-workspace/results-*Second, apply the ImageContentSourcePolicy to the cluster:
$ oc apply -f imageContentSourcePolicy.yamlNext, you must create a secret that contains the authentication credentials for your private registry. This secret should be based on the contents of your ~/.docker/config.json file.
To do this, create the secret in the openshift-marketplace namespace:
$ oc create secret generic my-registry-secret \
  --from-file=.dockerconfigjson=~/.docker/config.json \
  --type=kubernetes.io/dockerconfigjson \
  -n openshift-marketplace
NOTE: The
--typeisn’t just metadata – it tells Kubernetes how to parse the secret. If you use Opaque (the default), Kubernetes won’t understand that this secret contains Docker credentials, and your Pod’s imagePullSecrets will fail.
Then, edit the CatalogSource YAML file and reference the newly created secret under the spec section using the secrets field. Add the secret in the end of the file like this example:
apiVersion: operators.coreos.com/v1alpha1
kind: CatalogSource
metadata:
  name: cs-redhat-operator-index
  namespace: openshift-marketplace
spec:
  image: <your registry address>/acm-multicluster/redhat/redhat-operator-index:v4.14
  sourceType: grpc
  tls:
    insecure: true
  secrets:
- <secret-name>Finally, apply the CatalogSource to the cluster:
$ oc apply -f catalogSource.yamlThis sequence ensures that OpenShift can authenticate with the private registry before attempting to use the catalog.
Now, check that the pod of the CatalogSource is up and running:
$ oc get pods -n openshift-marketplaceCheck with this command that you have this 2 operators:
$ oc get packagemanifests This is the output you should get:
multicluster-engine
advanced-cluster-management
Part 2 – Install the ACM Operator
- Navigate to OperatorHub in the OpenShift Console.
- Find Red Hat Advanced Cluster Management and the multicluster engine for Kubernetes operators.
- You should now see it listed from your local CatalogSource.
- Click Install, select the appropriate namespace, and proceed.
Part 3 – Deploy the MultiClusterHub (MCH)
Step 1: Required CRDs for MulticlusterHub
Before deploying the Advanced Cluster Management (ACM) and its key component, the MulticlusterHub resource, it is important to ensure that the required Custom Resource Definitions (CRDs) are already installed on your cluster. These CRDs define the schema for the Kubernetes resources used by ACM. While most of them are automatically installed when you deploy the ACM Operator, it’s still essential to be aware of them in case you need to troubleshoot or perform a manual setup.
Rather than trusting that the operator “just works,” I recommend to verify the ACM CRDs before deploying anything that depends on them. It’s a simple step, but is very powerful.
| CRD Name | Description |
|---|---|
| multiclusterhubs.operator.open-cluster-management.io | Defines the MulticlusterHub resource – the central ACM controller. |
| managedclusters.cluster.open-cluster-management.io | Represents each cluster managed by ACM. |
| managedclustersets.cluster.open-cluster-management.io | Allows grouping of managed clusters. |
| clusterclaims.cluster.open-cluster-management.io | Enables registration of clusters with claim support. |
| placements.operator.open-cluster-management.io | Defines placement strategies for deploying resources across clusters. |
| placementrules.apps.open-cluster-management.io | (Legacy) Rule-based placement logic across clusters. |
| multiclusterresources.operator.open-cluster-management.io | Manages and synchronizes resources across clusters. |
| helmreleases.helm.open-cluster-management.io | (Optional) Enables Helm chart deployments through ACM. |
This see more info about this CRDs visit this link: CRDs for ACM.
To confirm that the required CRDs have been successfully installed, you can run the following command:
$ oc get crds | grep open-cluster-managementStep 2: Create the MultiClusterHub Custom Resource
Create a YAML file named multiclusterhub.yaml:
Replace “your-catalogsource-name” with the name of your catalog source.
Replace “your-secret-name” with the name of secret that you create in step 4.
apiVersion: operator.open-cluster-management.io/v1
kind: MultiClusterHub
metadata:
  name: multiclusterhub
  namespace: open-cluster-management
  annotations:
    installer.open-cluster-management.io/mce-subscription-spec: |
      {"source":"<your-catalogsource-name>"}
spec:
  imagePullSecret:  <your-secret-name>
Apply the resource:
$ oc apply -f multiclusterhub.yamlStep 3: Monitor the Deployments
You can watch the status of the MCH (multiclusterhub) and the MCE (multicluster-engine) components being deployed:
$ oc get mce -n multicluster-engine$ oc get mch -n open-cluster-management$ oc get pods -n multicluster-engine$ oc get pods -n open-cluster-managementYou should see pods for multiclusterhub-operator, multicluster-engine, search, grc, console, and others (depending on the enabled features).
Once the MCH status is Running and all pods are Ready, ACM should be fully operational.
Step 4: Verifying the MultiClusterHub Installation
After deploying the MultiClusterHub and ensuring all components are running, the final step is to verify that the Advanced Cluster Management (ACM) console recognizes your hub cluster.
You need to see this section open in the top of the console

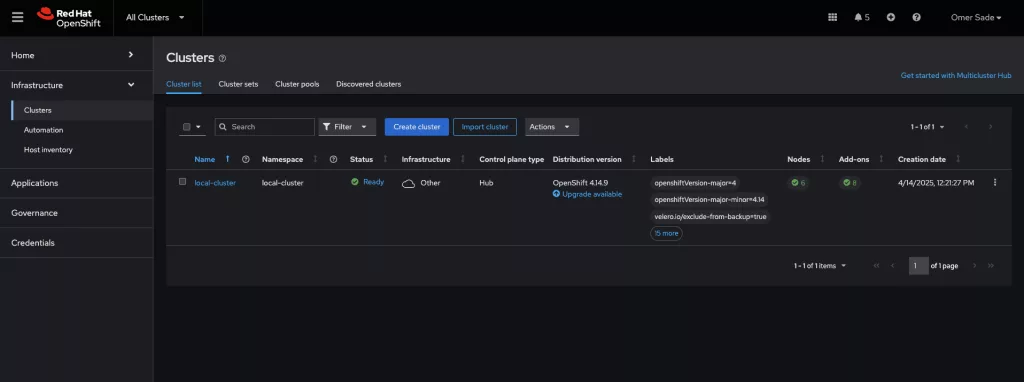
Access Clusters View from OpenShift Web Console
To access the Clusters View from the OpenShift web console, follow these steps:
- Once there, you should see an entry named local-cluster, which represents your hub cluster.
- First, navigate to the All Clusters section at the top of the page.
- Next, select Infrastructure
- Click on Clusters.
This action will bring you to the Cluster List tab.
Part 4 – How to Import an Existing Cluster into Red Hat ACM in a Disconnected Environment
Once ACM is installed and running in your disconnected environment, you can import external (managed) OpenShift clusters into ACM for centralized management. Here’s how to do it:
Steps to Import an Existing Cluster
- Head Over to ACM
- Open your ACM console (on the hub cluster).
- Go to Clusters, then click Create Cluster, and choose Import an Existing Cluster.
- Pick a Name
- Give your cluster a name. This is how ACM will recognize it later.
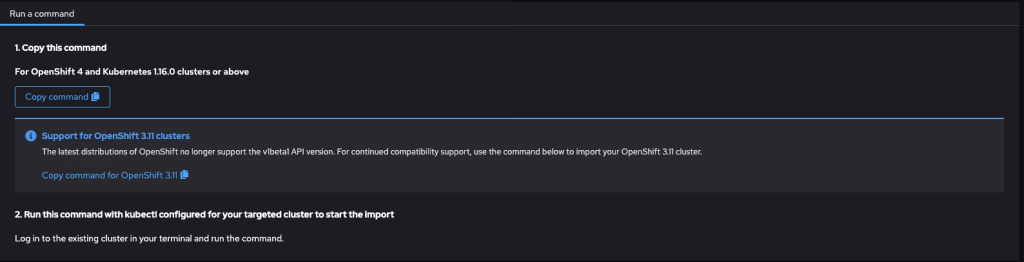
- Download the command
- Click Next and copy the generated command.
- This command will install the agent that connects your cluster to ACM.
This should look like the following example:
- Log Into the Cluster
- Use the oc login command to get access to the cluster you’re importing.
- Run the command that you generated on the improting cluster
- Check the Connection
$ oc get pods -n open-cluster-management-agent- Back to ACM
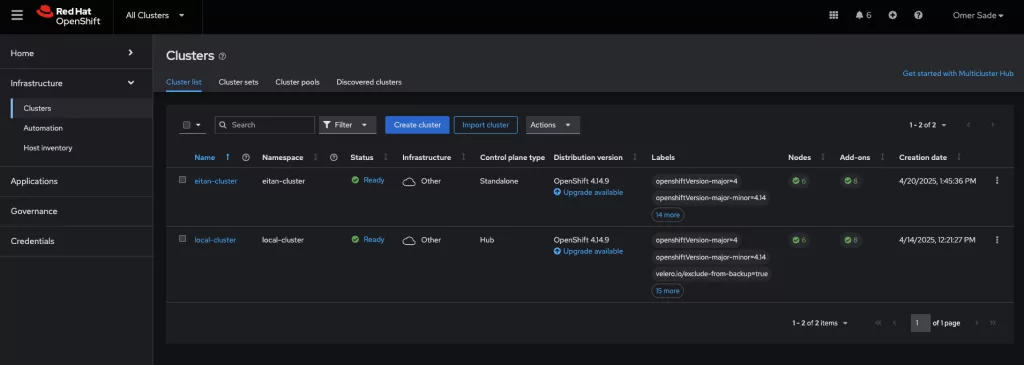
Your cluster should show up with a status like “Ready” when everything’s working.
This should look like this example:
Deploy an Example Application Using ArgoCD
Once your ACM (Advanced Cluster Management) is installed and the managed cluster is successfully imported, you can showcase a GitOps-style deployment using ArgoCD on your local-cluster to manage applications on your hub and managed clusters.
You can use this GitHub repository:
https://github.com/OmerSade1/mongo-openshift.git
This repository contains a Helm chart named fruits located at the path fruits and 2 argocd applications at the path argocd.
Create an ArgoCD Application that create 2 argocd applications one on each cluster
Create and Apply this ArgoCD Application manifest on the local-cluster like this example:
apiVersion: argoproj.io/v1alpha1
kind: Application
metadata:
  name: my-app-of-apps
  namespace: argo-cd
spec:
  project: default
  source:
    repoURL: <your-git-server>
    targetRevision: HEAD
    path: argocd
  destination:
    server: <hub-cluster-name>
    namespace: default
  syncPolicy:
    automated:
      prune: true
      selfHeal: true
$ oc apply -f app-of-apps.yamlReplace <your-git-server> with the URL of your internal Git repo and <hub-cluster-name> with the name of your hub cluster in ACM.
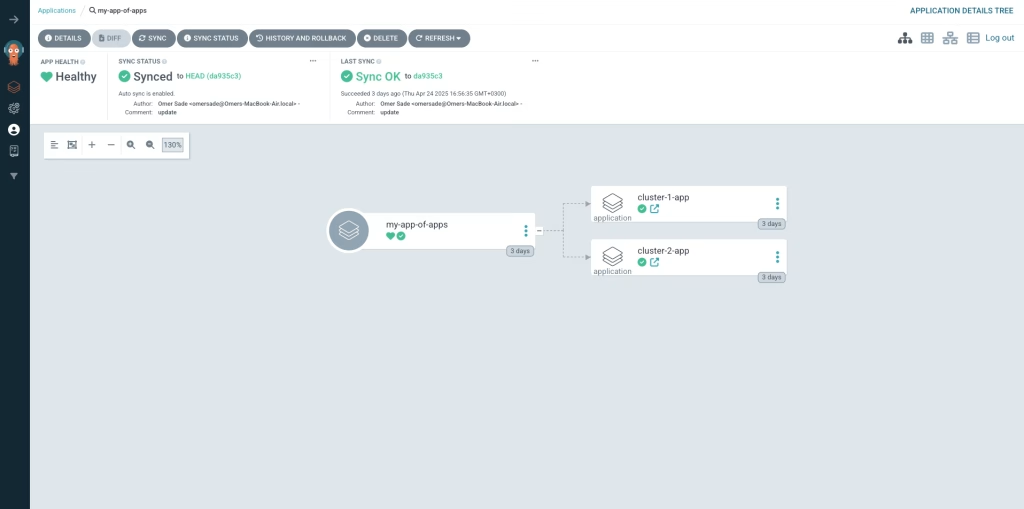
After the ArgoCD Application has been created and synced, you can verify that the 2 fruits applications is successfully deployed to the managed and hub clusters. You can also open the ArgoCD UI to visually confirm whether the application is deployed successfully, view its current status (e.g., Synced, OutOfSync, Healthy, Degraded), and inspect any errors or events if the deployment did not go as expected.
This should look like this in the ArgoCD UI:
At the terminal run this command in each cluster to check the pods are up and running.
$ oc get pods -n < cluster1-namespace>$ oc get pods -n < cluster2-namespace>This should look like this example:

To access the deployed applications from a browser:
$ oc get route -n <cluster1-namespace>$ oc get route -n <cluster2-namespace>This will return something like:
NAME HOST/PORT PATH SERVICES PORT
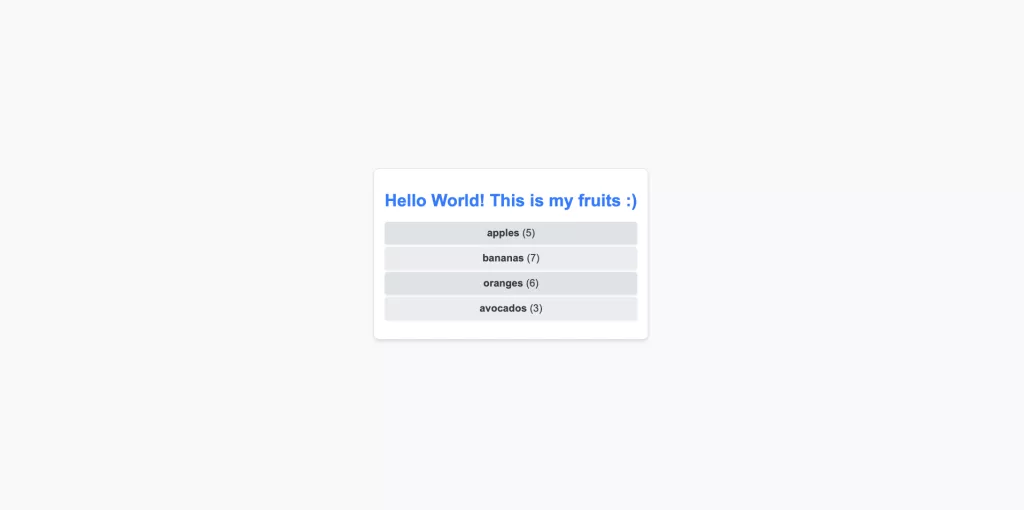
fruits fruits-default.apps.<cluster-domain> fruits 80Copy the value (e.g. fruits-default.apps.<your-cluster-domain>) and open it in a browser:
http://fruits-default.apps.<your-cluster-domain>This is what you need to see in the browser:
Summary
This guide walks you through setting up Red Hat Advanced Cluster Management (ACM) in a disconnected OpenShift environment using oc-mirror and more. It covers preparing a secure internal registry, downloading and transferring container images, and configuring OpenShift to use them. I’ve also shown how to import clusters into ACM and deploy applications using ArgoCD. The goal was to build a stable, efficient setup that works well in real-world environments like our customers requires.
For more information you can follow the official Red Hat documentation for more information about importing clusters: Red Hat ACM 2.2 – Importing a Target Managed Cluster to the Hub.