Introduction
In today’s cloud-native environments, securing infrastructure is a top priority. Wazuh, an open-source security platform, offers powerful capabilities such as intrusion detection, log analysis, vulnerability detection, and more. Deploying Wazuh on Air gapped Kubernetes allows organizations to implement these security measures even in isolated environments. In this guide, we’ll walk through the complete process of such a deployment, covering setup, configuration, and best practices. We’ll also demonstrate how to deploy agents on both cluster nodes and machines outside the cluster to ensure comprehensive monitoring.
Prerequisites
- A fully configured on-prem Kubernetes cluster. (You can use one our guides )
kubectlinstalled and configured to access your cluster.- Git installed (to clone the official Wazuh Kubernetes deployment repository).
Part 1: Deploying Wazuh on Air gapped Kubernetes
Step 1: Clone the Wazuh Kubernetes Repo and Setup SSL certificates
👉 official Wazuh Kubernetes repository
$ git clone https://github.com/wazuh/wazuh-kubernetes.git -b v4.12.0
$ cd wazuh-kubernetes
Next, Setup SSL certificates:
You can generate self-signed SSL certificates using the provided scripts or use your own:
for the Wazuh indexer cluster using the script:
$ wazuh/certs/indexer_cluster/generate_certs.shfor the Wazuh dashboard cluster using the script:
$ wazuh/certs/dashboard_http/generate_certs.shThe required certificates are imported via secretGenerator on the kustomization.yml file:
secretGenerator:
    - name: indexer-certs
      files:
        - certs/indexer_cluster/root-ca.pem
        - certs/indexer_cluster/node.pem
        - certs/indexer_cluster/node-key.pem
        - certs/indexer_cluster/dashboard.pem
        - certs/indexer_cluster/dashboard-key.pem
        - certs/indexer_cluster/admin.pem
        - certs/indexer_cluster/admin-key.pem
        - certs/indexer_cluster/filebeat.pem
        - certs/indexer_cluster/filebeat-key.pem
    - name: dashboard-certs
      files:
        - certs/dashboard_http/cert.pem
        - certs/dashboard_http/key.pem
        - certs/indexer_cluster/root-ca.pem
Step 2: Apply Wazuh Kubernetes Deployment Manifests
Navigate to the wazuh-kubernetes directory and run:
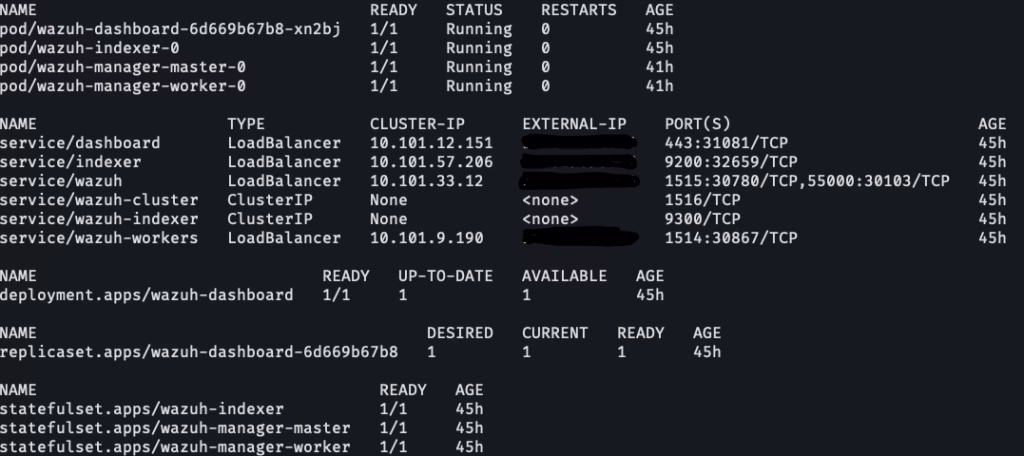
$ kubectl apply -k envs/local-envCheck the manifests status:
$ kubectl get all -n wazuhThis is the output you should get:
Now, Open your browser and navigate to:
https://<dashbord-external-ip>you need to see this:
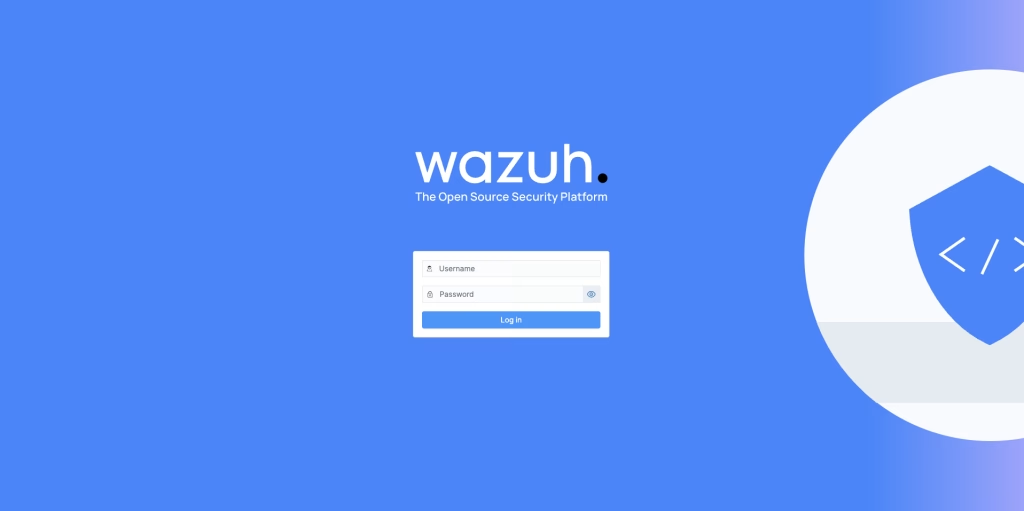
The default credentials are typically:
- Username:
admin - Password:
SecretPassword
Step 3: Change Wazuh admin User Password
To enhance security , do this steps to update the default admin user’s password for Wazuh Indexer.
1. Start a Bash shell in the indexer pod:
$ kubectl exec -it wazuh-indexer-0 -n wazuh -- /bin/bashRun the following commands to create a hashed password , when prompted enter your new password:
$ export JAVA_HOME=/usr/share/wazuh-indexer/jdk
$ bash /usr/share/wazuh-indexer/plugins/opensearch-security/tools/hash.sh
Copy the generated hash and exit the Bash shell.
2. update the internal_users.yml File
$ cd  wazuh/indexer_stack/wazuh-indexer/indexer_conf
$ vim internal_users.yml
Replace the existing hash for the admin block:
admin:
  hash: "<your-new-password-hash>"
  reserved: true
  backend_roles:
    - "admin"
  description: "Demo admin user"
3. Update the admin secret
Encode your new password in base64:
$ echo -n "NewPassword" | base64Edit the secret file:
$ vim wazuh/secrets/indexer-cred-secret.yamlReplace the password value:
data:
  username: YWRtaW4=              # "admin"
password: <your-base64-password>4. Apply the changes:
$ kubectl apply -k envs/local-env5. Apply security configuration
Reconnect to the indexer pod:
$ kubectl exec -it wazuh-indexer-0 -n wazuh -- /bin/bashSet environment variables:
export INSTALLATION_DIR=/usr/share/wazuh-indexer
export CACERT=$INSTALLATION_DIR/certs/root-ca.pem
export KEY=$INSTALLATION_DIR/certs/admin-key.pem
export CERT=$INSTALLATION_DIR/certs/admin.pem
export JAVA_HOME=/usr/share/wazuh-indexer/jdk
Wait a few minutes, then apply the changes:
$ bash /usr/share/wazuh-indexer/plugins/opensearch-security/tools/securityadmin.sh -cd /usr/share/wazuh-indexer/opensearch-security/ -nhnv -cacert $CACERT -cert $CERT -key $KEY -p 9200 -icl -h $NODE_NAME6. Restart Wazuh Manager Pods
$ kubectl delete -n wazuh pod/wazuh-manager-master-0 pod/wazuh-manager-worker-0You can now log in to the Wazuh dashboard using the new admin password.
Part 2: Deploy Wazuh Agent on Kubernetes Nodes
To monitor your Kubernetes nodes with Wazuh, you’ll deploy the Wazuh agent as a DaemonSet on every node in the cluster (both master and workers).
Step 1: Create the Secret
$ kubectl create secret generic wazuh-auth -n wazuh \
  --from-literal=WAZUH_REGISTRATION_PASSWORD=<your_registration_password>
Replace
<your_registration_password>with the actual registration password used by your Wazuh manager.
this password is typically stored in the manager’s internal configuration file.
Open a shell inside the running Wazuh manager pod (wazuh-manager-master-0) in the wazuh namespace.
$ kubectl exec -it -n wazuh wazuh-manager-master-0 -- bashOnce inside the container, run:
$ cat /var/ossec/etc/authd.passThis will output the registration password
Step 2: Create and apply the RBAC and DaemonSet YAML Files
In order for the Wazuh agent to collect information from Kubernetes nodes, pods, and services, it needs permission to access these resources through the Kubernetes API. This is achieved by configuring RBAC (Role-Based Access Control).
Here’s the required configuration:
# rbac.yaml

apiVersion: v1
kind: ServiceAccount
metadata:
  name: wazuh-agent
  namespace: wazuh
---
apiVersion: rbac.authorization.k8s.io/v1
kind: ClusterRole
metadata:
  name: wazuh-agent
rules:
- apiGroups: [""]
  resources: ["nodes", "pods", "services"]
  verbs: ["get", "list", "watch"]
---
apiVersion: rbac.authorization.k8s.io/v1
kind: ClusterRoleBinding
metadata:
  name: wazuh-agent
roleRef:
  apiGroup: rbac.authorization.k8s.io
  kind: ClusterRole
  name: wazuh-agent
subjects:
- kind: ServiceAccount
  name: wazuh-agent
  namespace: wazuh
$ kubectl apply -f rbac.yamlWithout this RBAC setup, the Wazuh agent will not have access to key Kubernetes resources and may fail to collect important cluster-level metadata.
At the time of writing, Wazuh does not provide an official Docker image for the wazuh-agent.
To deploy the agent in Kubernetes, I built a custom Docker image based on Wazuh’s installation documentation.
The image is hosted on Docker Hub and is referenced in the DaemonSet:
omersade/wazuh-agent:v4.12.0-1I chose to build the custom Docker image using Wazuh Agent version 4.12.0-1 beacuse this version is a stable release officially published by Wazuh, compatible with the latest Wazuh manager versions (e.g., 4.12.x). This ensures agent-manager communication works smoothly without version mismatch issues.
Save the following content to a file named wazuh-agent.yaml:
apiVersion: apps/v1
kind: DaemonSet
metadata:
  name: wazuh-agent
  namespace: wazuh
  labels:
    app: wazuh-agent
spec:
  selector:
    matchLabels:
      name: wazuh-agent
  template:
    metadata:
      labels:
        name: wazuh-agent
    spec:
      containers:
      - name: wazuh-agent
        image: omersade/wazuh-agent:v4.12.0-1
        imagePullPolicy: Always
        env:
        - name: WAZUH_MANAGER
          value: "wazuh"                # Service name of the Wazuh manager
        - name: WAZUH_WORKER
          value: "wazuh-workers"          # Service name of the Wazuh workers
        - name: WAZUH_REGISTRATION_PASSWORD
          valueFrom:
            secretKeyRef:
              name: wazuh-auth
              key: WAZUH_REGISTRATION_PASSWORD
        - name: AGENT_NAME
          valueFrom:
            fieldRef:
              fieldPath: spec.nodeName
        - name: GROUPS
          value: "<REPLACE_WITH_GROUP_NAME>"  # Replace with the desired group name
        securityContext:
          privileged: true
          runAsUser: 101
          runAsGroup: 101
      tolerations:
      - key: "node-role.kubernetes.io/master"
        operator: "Exists"
        effect: "NoSchedule"
      - key: "node-role.kubernetes.io/control-plane"
        operator: "Exists"
        effect: "NoSchedule"
$ kubectl apply -f wazuh-agent.yamlStep 3: Verify the Deployment
Ensure the pods are running on all nodes:
$ kubectl get pods -n wazuh -o wideYou should see one wazuh-agent pod per node.
Verify the agents in the dashboard UI:

Part 3: Deploying a Wazuh Agent on a Machine Outside the Air Gapped Kubernetes Cluster
Sometimes you need to monitor servers outside your Kubernetes cluster, such as physical hosts or VMs on a different VLAN. You can still connect them to your existing Wazuh Manager inside the cluster.
Before proceeding, ensure the following:
- Ensure that the air-gapped Kubernetes node where the Wazuh manager is running has another network interface and VLAN leg connected to the external network. This allows communication with agents on other subnets or VLANs.
- Ensure that ports 1514 and 1515 are open in the firewall on the Machine outside the cluster.
Also make sure the external IPs of thewazuh-managerandwazuh-workerservices are not blocked by firewalls or network security policies. - Manager (master) — used for registration (port 1515)
- Worker — used for agent communication (port 1514)
To check which IP and ports are exposed by your Wazuh services, run:
$ kubectl get svc -n wazuhverify that the machine can reach the wazuh-manager and wazuh-worker external ip using telnet:
$ telnet <wazuh-manager-ip> 1515
$ telnet <wazuh-worker-ip> 1514
Once you’ve verified network access and the correct ports are open, you can register and deploy a new Wazuh agent using the Wazuh Dashboard UI.
Steps to Add a New Agent
- Click on “Agents” from the sidebar.
- Click the “Deploy new agent” button in the top right.
- Fill in the following details:
- Agent name: Any unique name to identify this agent.
- Operating System: Choose Linux, Windows, or macOS.
- Server address: This is the address the agent uses to communicate with the server. Enter an IP address or a fully qualified domain name (FQDN).
- Copy the generated command and run it on the machine you want to install the agent.
Here’s the properly formatted example of the generated command for Ubuntu or Debian-based machines:
$ wget https://packages.wazuh.com/4.x/apt/pool/main/w/wazuh-agent/wazuh-agent_4.12.0-1_amd64.deb
   && \
  sudo WAZUH_MANAGER='Wazuh-manager-worker-ip' \
  WAZUH_REGISTRATION_PASSWORD='******' \
  WAZUH_AGENT_GROUP='your chosen group' \
  WAZUH_AGENT_NAME='your-agent-name' \
  dpkg -i ./wazuh-agent_4.12.0-1_amd64.deb
After the wazuh agent installed , run this command on the agent machine:
$ /var/ossec/bin/agent-auth -m <wazuh-manager-ip> -p 1515This command is used once (or whenever you need to re-register the agent) to securely get an authentication key from the Wazuh manager.
Configure agent to connect to the worker , Edit the Wazuh agent config file:
$ vim /var/ossec/etc/ossec.confEdit the block <client> to be like this:
This configuration tells the agent where to send its regular log data, alerts, and status updates after registration.
<client>
    <server>
      <address><wazuh-worker-ip></address>
      <port>1514</port>
      <protocol>tcp</protocol>
    </server>
    <config-profile>ubuntu, ubuntu22, ubuntu22.04</config-profile>
    <notify_time>10</notify_time>
    <time-reconnect>60</time-reconnect>
    <auto_restart>yes</auto_restart>
    <crypto_method>aes</crypto_method>
    <enrollment>
      <enabled>no</enabled>
      <agent_name>registry</agent_name>
      <groups>default</groups>
      <authorization_pass_path>etc/authd.pass</authorization_pass_path>
    </enrollment>
  </client>
replace
<wazuh-worker-ip>with the actual external IP of the Wazuh Worker LoadBalancer service.
There are two main methods for enrolling Wazuh agents with the Wazuh manager:
- Enrollment via
authd(automatic enrollment) – the agent reaches out to the manager using a temporary key and is authorized by theauthddaemon. - Enrollment via agent configuration (manual configuration) – the agent is pre-configured with the Wazuh worker’s IP address or FQDN in its
ossec.conf.
In this case, we are using the second method: Enrollment via agent configuration, where we manually set the Wazuh worker’s IP in the agent configuration.
Now , enable and start the Wazuh agent service:
$ systemctl daemon-reload
$ systemctl enable wazuh-agent
$ systemctl start wazuh-agent
Confirming Traffic from External Server in Wazuh
After deploying the Wazuh agent on a machine outside the Kubernetes cluster, we want to verify that the Wazuh server is receiving logs from it.
- Navigate to the Threat Hunting Module in the Wazuh UI
- You should now see a list of log entries from the external agent.
Summary
In this post, we demonstrated how to successfully complete deploying Wazuh on air gapped Kubernetes using the official Wazuh Kubernetes repository. Deployed the Wazuh stack with kubectl, deployed Wazuh agents within the Kubernetes nodes via DaemonSet, and configured an agent on an external machine across VLANs to communicate with the Wazuh manager and workers. This comprehensive Wazuh Kubernetes deployment ensures centralized security visibility and effective threat detection across your hybrid infrastructure.
For more information you can follow the official Wazuh documentation: Wazuh.