Introduction
In this post series we will follow what is needed for you to know How to prepare a NodeJS application for Kubernetes. On Part 1, We will use a NodeJS example application, prepare a Dockerfile for it and then prepare the image for deployment on Kubernetes. Then, on Part 2, we will use a Deployment yaml files to deploy our application into Kubernetes. This is a part of our Kubernetes articles here in k8s.co.il
Application Description
For the demonstration, we will create a small app called “WorldCup” to demonstrate how we nee to prepare it. The app will show 16 countries competing each other in a battle who for who is the best country.
Application Design
We will have a straight forward design which is very common in many applications deployed on K8s. The application will have a Backend, running NodeJS, and a Frontend running React. This, of course, means two different deployments and two different container images.
Let’s the see how we create those and prepare it for a containerized environment.
Procedure
In the following steps we will see the application, the Dockerfile to prepare the application for containerized environment for both Frontend and Backend of the application.
The application resides in k8s-worldcup directory. with two sub-directories, backend and worldcup-frontend.
Let’s create the structure for the backend:
$ mkdir -p k8s-worldcup/backendBackend Application
Our backend application is using javascript. The NodeJS application is basically one file one – app.js in the backend directory:
// Add this line at the beginning of app.js in the backend folder
const cors = require('cors');
const express = require('express');
const app = express();
// Add this line right after defining the app variable
app.use(cors());
const port = process.env.PORT || 3000;

const countries = [
  'Argentina', 'Brazil', 'France', 'Germany',
  'Italy', 'Netherlands', 'Spain', 'England',
  'Portugal', 'Belgium', 'Croatia', 'Uruguay',
  'Sweden', 'Switzerland', 'Denmark', 'Mexico'
];

const teams = countries.map(country => ({
  country,
  points: 0,
  matchesPlayed: 0,
  matchesWon: 0,
  matchesLost: 0,
  matchesDrawn: 0
}));

function getRandomInt(max) {
  return Math.floor(Math.random() * max);
}

function getRandomMessage() {
  const messages = [
    "Don't bet your life savings on this one!",
    'Expect the unexpected!',
    'Football is full of surprises!',
    'Keep your eyes on the ball!'
  ];
  return messages[getRandomInt(messages.length)];
}

function randomOutcome() {
  const teamAIndex = getRandomInt(teams.length);
  let teamBIndex = getRandomInt(teams.length);

  while (teamAIndex === teamBIndex) {
    teamBIndex = getRandomInt(teams.length);
  }

  const outcome = getRandomInt(3);
  const message = getRandomMessage();

  teams[teamAIndex].matchesPlayed++;
  teams[teamBIndex].matchesPlayed++;

  if (outcome === 0) {
    // Team A wins
    teams[teamAIndex].points += 3;
    teams[teamAIndex].matchesWon++;
    teams[teamBIndex].matchesLost++;
  } else if (outcome === 1) {
    // Team B wins
    teams[teamBIndex].points += 3;
    teams[teamBIndex].matchesWon++;
    teams[teamAIndex].matchesLost++;
  } else {
    // Draw
    teams[teamAIndex].points++;
    teams[teamBIndex].points++;
    teams[teamAIndex].matchesDrawn++;
    teams[teamBIndex].matchesDrawn++;
  }

  return {
    teamA: teams[teamAIndex],
    teamB: teams[teamBIndex],
    outcome: outcome === 2 ? 'draw' : outcome === 0 ? 'teamA' : 'teamB',
    message
  };
}
app.get('/initialData', (req, res) => {
    res.json({ teams });
  });

app.get('/predict', (req, res) => {
  const prediction = randomOutcome();
  res.json({ ...prediction, teams });
});

app.listen(port, () => {
  console.log(`Backend service listening at http://localhost:${port}`);
});
To install and check it’s working we can run the following commands:
$ cd k8s-worldcup/backend
$ npm init -y
$ npm i express
$ npm i cors
Edit the package.json to have the following script:
"scripts": {
    "start:backend": "node app.js"
  },
We can now run the code for tests:
$ npm run "start:backend"

> backend@1.0.0 start:backend
> node app.js

Backend service listening at http://localhost:3000
Go to the URL http://localhost:3000/predict to check it is working.
Refresh several times in order to verify the code works.
We now have a working backend.
Frontend Application
Our frontend application is using React. Let’s create the folder structure for our application:
$ cd worldcup
$ npx create-react-app worldcup-frontend
$ cd worldcup-frontend
Replace the src/App.js file with the following one:
import React, { useState, useEffect } from 'react';
import './App.css';

const apiUrl = `https://${process.env.REACT_APP_API_URL}`; // Replace with the actual backend URL if needed

function App() {
  const [teams, setTeams] = useState([]);
  const [sortedTeams, setSortedTeams] = useState([]);
  const [message, setMessage] = useState('');

  useEffect(() => {
    async function fetchInitialData() {
      const response = await fetch(`${apiUrl}/initialData`);
      const data = await response.json();
      setTeams(data.teams);
    }

    fetchInitialData();
  }, []);

  useEffect(() => {
    const sorted = [...teams].sort((a, b) => b.points - a.points);
    setSortedTeams(sorted);
  }, [teams]);

  async function handlePredictButtonClick() {
    const response = await fetch(`${apiUrl}/predict`);
    const data = await response.json();

    const updatedTeams = teams.map(team => {
      if (team.country === data.teamA.country) {
        return data.teamA;
      } else if (team.country === data.teamB.country) {
        return data.teamB;
      } else {
        return team;
      }
    });

    setTeams(updatedTeams);
    setMessage(data.message);
  }

  return (
    <div className="App">
      <header className="App-header">
        <h1>WorldCup 2023</h1>
        </header>
        <main>
            <section>
                <button onClick={handlePredictButtonClick}>Predict Next Match</button>
                <div>{message}</div>
            </section>
            <section className="standings">
            {teams.map((team) => {
                const maxPoints = Math.max(...sortedTeams.map((t) => t.points));
                const pointPercentage = team.points / maxPoints;
                var lineborder = "2px solid white";
                if (parseInt(team.points) === parseInt(maxPoints)) {
                    lineborder = '2px solid red';
                }
                const hue = 500; // Red hue
                const lightness = 90 - (pointPercentage * 70); // Lightness ranging from 60% to 100%

                const cardStyle = {
                backgroundColor: `hsl(${hue}, 50%, ${lightness}%)`,
                color: lightness < 70 ? 'white' : 'black', // Set text color based on background lightness
                border: `${lineborder}`
                };

                return (
                <div key={team.country} className={`team-card`} style={cardStyle}>
                    <strong>{team.country}</strong>
                    <div>Points: {team.points}</div>
                    <div>Played: {team.matchesPlayed}</div>
                    <div>Won: {team.matchesWon}</div>
                    <div>Lost: {team.matchesLost}</div>
                    <div>Drawn: {team.matchesDrawn}</div>
                </div>
                );
            })}
            </section>


        </main>
    </div>
  );
}

export default App;
Update the src/App.css file with these CSS styles:
.App {
    font-family: Arial, sans-serif;
    line-height: 1.6;
    margin: 0;
    padding: 0;
    text-align: center;
  }

  .App-header {
    background-color: #333;
    color: #fff;
    padding: 1rem;
  }

  button {
    display: inline-block;
    background-color: #333;
    color: #fff;
    padding: 0.5rem 1rem;
    border: none;
    cursor: pointer;
    margin-bottom: 1rem;
  }

  button:hover {
    background-color: #555;
  }

  table {
    width: 100%;
    border-collapse: collapse;
    margin-bottom: 1rem;
  }

  th,
  td {
    padding: 1rem;
    border: 1px solid #ccc;
  }

  th {
    background-color: #f4f4f4;
    text-align: left;
  }

  /* Add these styles to your existing App.css */
.standings {
  display: flex;
  flex-wrap: wrap;
  justify-content: center;
}

.team-card {
  display: flex;
  flex-direction: column;
  align-items: center;
  background-color: #f4f4f4;
  padding: 1rem;
  margin: 1rem;
  width: 150px;
  border: 1px solid #ccc;
  border-radius: 5px;
}

.team-card strong {
  margin-bottom: 0.5rem;
}
We can test and see if it works, and if it can connect to our backend application.
Install all the dependencies:
# Clear cache and old folders:
$ rm -rf node_modules package-lock.json
$ npm install
Once this is done, we have our node_modules folder. Let’s edit the scripts section in package.json:
  "scripts": {
    "start": "REACT_APP_API_URL=LOCALHOST:3000 NODE_OPTIONS=--openssl-legacy-provider react-scripts start",
    "start:k8s": "react-scripts start",
    "build": "react-scripts build",
    "test": "react-scripts test",
    "eject": "react-scripts eject"
  },
Please note we add REACT_APP_API_URL to point the React server to our Backend server. It’s not hard coded to the App.js script, but is an environment variable. This will be pushed to the container via the yaml files in Kubernetes. In Kuberenetes we will use start:k8s instead.
Let’s run the server:
$ npm startOutput should look something like:
Compiled successfully!

You can now view worldcup-frontend in the browser.

  Local:            http://localhost:3001
  On Your Network:  http://192.168.100.12:3001

Note that the development build is not optimized.
To create a production build, use npm run build.

webpack compiled successfully
And you should have something like this as result:
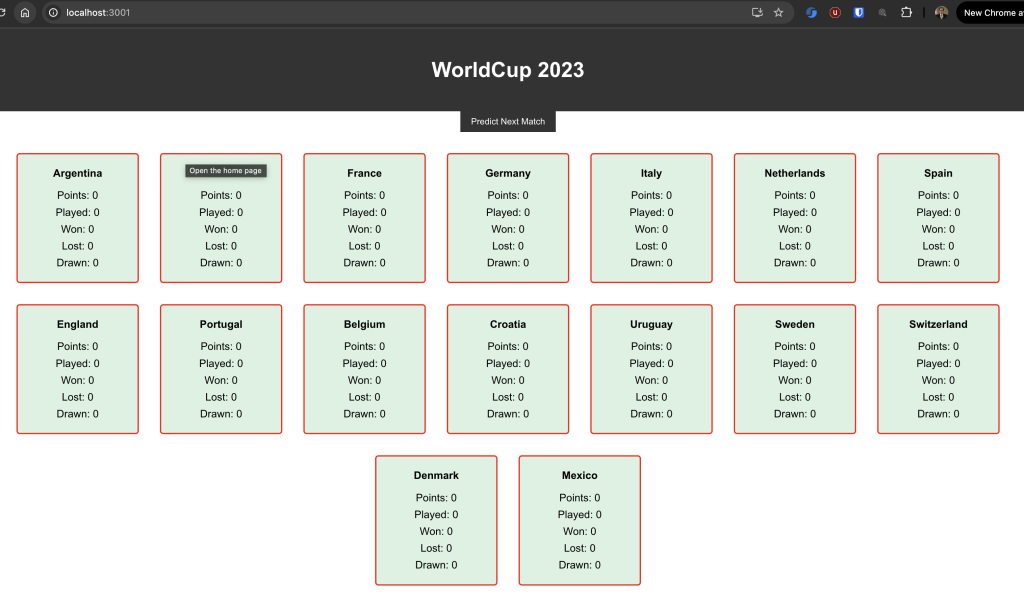
Now we have our react app running locally. We can see that the backend servers answered with 16 countries for the tournament.
Summary
In this two-part guide on How to prepare a NodeJS application for Kubernetes, we share our expertise in optimizing applications for kubernetes deployment. The Part 1 covered essential steps to ready your NodeJS app for containerization, while the second part will walk you through creating the necessary deployment yaml files for deploying to Kubernetes. The main takeaways from this post should be that we have separate containers for React and Backend (NodeJS). This article, like many others at Octopus Computer Solutions, shows our Kubernetes knowledge and how you can be prepared for fast, scalable, and secure deployment.