Introduction
This document is designed to get you started “From Zero to Hero”. By the time you finish your Espresso – you have a running NIM. It’s easy to deploy the NVIDIA NIM Operator in 10 Minutes. In this guide, we’ll see how NVIDIA NIM simplifies managing GPUs in Kubernetes, optimizes performance for ML, AI, and other GPU-intensive workloads.
Abstract
Developers are pumped about NVIDIA NIM microservices, which make deploying generative AI models faster and easier across cloud, data centers, and GPU workstations. These microservices handle key parts of AI inference workflows, like multi-turn conversational AI in RAG pipelines.
But managing these services at scale can be a headache for MLOps and Kubernetes admins. That’s why NVIDIA introduced the NIM Operator—a Kubernetes operator that automates the deployment, scaling, and management of NIM microservices. With just a few commands, you can deploy and scale AI models effortlessly, letting your ops teams focus on the important stuff!
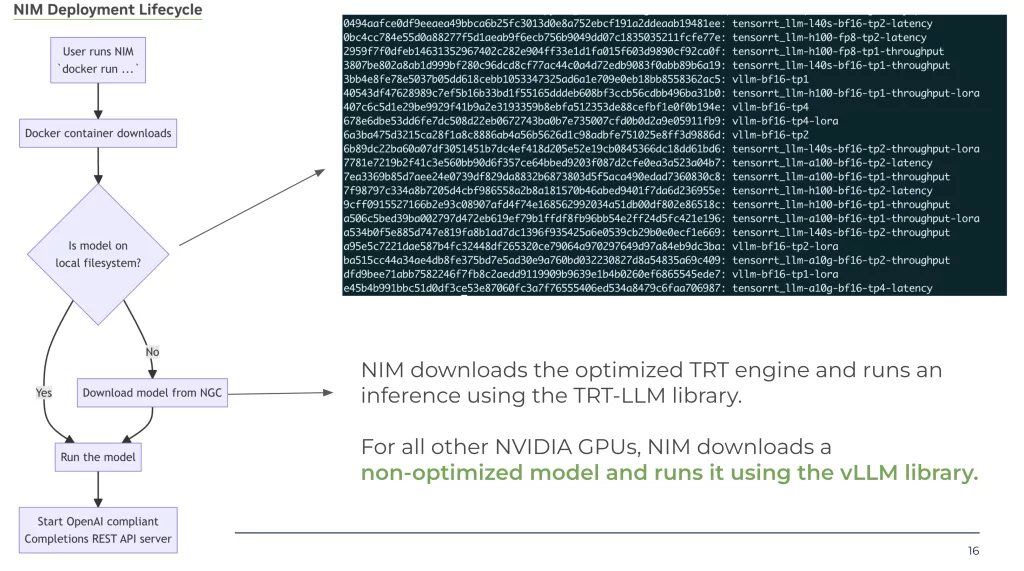
This example show the lifecycle – in Kubernetes its the same – just instead of “docker run” – kubelet is in charge
What Do I Need Before I start?
- Kubernetes + RKE2 1.22 –> 1.30
- Openshift 4.12-4.16
- NVIDIA GPU Operator version 24.3.0 or higher
- kubectl to match you Kubernetes version
- HELM
- GPU – H100 , A100 , L40
- – See support matrix https://docs.nvidia.com/nim/large-language-models/latest/support-matrix.html
- NGC API Key from NVIDIA
- Run both NIMCACHE & NIMSERVICE in the same namespace
STEP 1 – Installing the NIM Operator
In this step, we set up the NVIDIA NIM operator, which simplifies deploying AI models on Kubernetes clusters with GPUs.
Prepare Secrets & Helm
$ helm repo add nvidia https://helm.ngc.nvidia.com/nvidia    && helm repo update
$ kubectl create namespace nim-operator

$ kubectl create secret -n nim-operator docker-registry ngc-secret \
    --docker-server=nvcr.io \
    --docker-username='$oauthtoken' \
    --docker-password=<ngc-api-key>
Install the Operator
$ helm install nim-operator nvidia/k8s-nim-operator -n nim-operatorVerify functionality
$ kubectl get pods -n nim-operatorOutput should look as follows:
NAME                                                    STATUS    RESTARTS      AGE
nim-operator-k8s-nim-operator-6b546f57d5-g4zgg  2/2     Running     0           35h
STEP 2 – Model Caching
In this second step, NIM microservices support automatic profile selection by determining the GPU model and count on the node and attempting to match the optimal model profile. Alternatively, NIM microservices support running a specified model profile, but this requires that you review the profiles and know the profile ID.
NOTE: For more information, refer to Model Profiles in the NVIDIA NIM for LLMs documentation.
In the previous blog post NVIDIA Nims In Air Gapped Environment I mentioned how to list available models – using the list-model-profiles CLI command.
Both YAMLS create a PVC needed for our NIM cache!
Example 1 – Specifying model simple wording method
apiVersion: apps.nvidia.com/v1alpha1
kind: NIMCache
metadata:
  name: meta-llama3-8b-instruct2
spec:
  source:
    ngc:
      modelPuller: nvcr.io/nim/meta/llama-3.1-8b-instruct:1.2.2
      pullSecret: ngc-secret
      authSecret: ngc-api-secret
      model:
        engine: tensorrt_llm
        tensorParallelism: "1"
        precision: bf16
        qosProfile: throughput
  storage:
    pvc:
      create: true
      storageClass: nfs-csi
      size: "50Gi"
      volumeAccessMode: ReadWriteMany
Example 2 – Specifying model based on profile ID
apiVersion: apps.nvidia.com/v1alpha1
kind: NIMCache
metadata:
  name: meta-llama3-8b-instruct
spec:
  source:
    ngc:
      modelPuller: nvcr.io/nim/meta/llama-3.1-8b-instruct:1.2.2
      pullSecret: ngc-secret
      authSecret: ngc-api-secret
      model:
        profiles:
        - 3807be802a8ab1d999bf280c96dcd8cf77ac44c0a4d72edb9083f0abb89b6a19
  storage:
    pvc:
      create: true
      storageClass: nfs-csi
      size: "50Gi"
      volumeAccessMode: ReadWriteMany
Verify NIM was cached correctly
Apply the YAML
$ kubectl create -f nim-cache.yamlOnce we run the YAML file – we can now monitor the progress – till we reach a “Ready” state.
$ k get nimcaches

nim-operator-k8s-nim-operator-6b546f57d5-g4zgg  2/2     Running     0           35h

$ k get nimcaches

meta-llama3-8b-instruct            Ready    meta-llama3-8b-instruct-pvc   2m45s
Veirfy models are downloaded and process started
$ kubectl logs meta-llama3-8b-instruct-job-5bht4 We can see the profile name and the exact model info – notices the pre_download command – file is being downloaded
INFO 2024-10-08 14:48:21.59 pre_download.py:80] Fetching contents for profile 3807be802a8ab1d999bf280c96dcd8cf77ac44c0a4d72edb9083f0abb89b6a19
INFO 2024-10-08 14:48:21.60 pre_download.py:86] {
  "feat_lora": "false",
  "gpu": "L40S",
  "gpu_device": "26b5:10de",
  "llm_engine": "tensorrt_llm",
  "pp": "1",
  "precision": "bf16",
  "profile": "throughput",
  "tp": "1"
}
Step 3 – Run NIM Models!
We are now read to run our NIM Model!
NOTE: We will use the CACHE from Step 2 above
apiVersion: apps.nvidia.com/v1alpha1
kind: NIMService
metadata:
  name: meta-llama3-8b-instruct
spec:
  image:
    repository: nvcr.io/nim/meta/llama-3.1-8b-instruct
    tag: 1.1.2
    pullPolicy: IfNotPresent
    pullSecrets:
      - ngc-secret
  authSecret: ngc-api-secret
  storage:
    nimCache:
      name: meta-llama3-8b-instruct
      profile: '3807be802a8ab1d999bf280c96dcd8cf77ac44c0a4d72edb9083f0abb89b6a19'
  replicas: 1
  resources:
    limits:
      nvidia.com/gpu: 1
  expose:
    service:
      type: ClusterIP
      port: 8000
Review Pod status –> k get nimservices
$ k get nimservices

meta-llama3-8b-instruct Ready                                  4m1s
Our pod is ready! Time for a quick health-check !
$ kubectl get svc  | grep llama | awk '{print $3 }'
$ kubectl run --rm -it -n default curl --image=curlimages/curl:latest -- ash
$ curl http://10.110.172.10:8000/v1/health/ready
Output will be:
{"object":"health.response","message":"Service is ready."}Summary
Deploying the NVIDIA NIM Operator in 10 Minutes brings powerful GPU management capabilities to your Kubernetes cluster. In this guide we walked-through the installation process, helping you with AI and ML tasks.
I think – we will see the NIMCACHE being used for many models – so enterprise can have a mix-and-match approach to easy scale on-prem, air-gapped or in the cloud.